Shopify カスタム統合設定
このページでは、カスタムストアフロントを使用して、Shopify HydrogenストアやヘッドレスShopifyストアとBrazeを統合する方法を説明する。
このガイドでは、Shopify の Hydrogen フレームワークを例にしています。ただし、ブランドが「headless」フロントエンド設定でストアのバックエンドで Shopify を使用している場合も、同様のアプローチをとることができます。
ShopifyのヘッドレスストアをBrazeと統合するには、以下の2つの目標を達成する必要がある:
- Braze Web SDK を初期化してロードし、オンサイトトラッキングを有効にする
手動でShopify Web サイトにコードを追加して、Braze オンサイトのトラッキングを有効にします。ShopifyヘッドレスストアにBraze SDKを実装することで、セッション、匿名のユーザー行動、チェックアウト前のショッパーアクション、そして開発チームと一緒に選択したカスタムイベントや カスタム属性を含むオンサイトアクティビティをトラッキングすることができます。また、アプリ内メッセージやコンテンツカードなど、SDK がサポートするチャネルを追加することもできます。
2.Braze の Shopify 統合をインストールする
ShopifyストアをBrazeに接続すると、ShopifyのWebhookを通して顧客、チェックアウト、注文、商品データにアクセスできるようになる。
統合を開始する前に、Shopify ストアフロントのチェックアウトサブドメインが正しく設定されていることを確認します。詳細については、Migrate from the online store to Hydrogen を参照してください。
この設定が正しく行われないと、Braze は Shopify チェックアウトWebhook を処理できなくなります。また、ローカルの開発環境で統合をテストすることもできません。なぜなら、それはあなたのストアフロントとチェックアウトページ間の共有ドメインに依存しているからです。
これらの目標を達成するには、以下のステップに従ってください。
Braze Web SDKを初期化し、読み込む。
ステップ 1: Braze Web サイトアプリを作成する
Braze で、[設定] > [アプリの設定] に移動し、[アプリの追加] を選択します。アプリに「Shopify」という名前を付けます。
ショップ名は「Shopify」にする必要があります。そうしないと、統合が適切に機能しない場合があります。
ステップ2: サブドメインおよび環境変数の追加
- Shopifyサブドメインをオンラインストアから Hydrogen にトラフィックをリダイレクトするように設定します。
- ログイン用のコールバック URI を追加します。(ドメインが追加されると、自動的にURI が追加されます)。
- Shopify 環境変数を設定します。
- ステップ 1 で作成した Web サイトアプリの値を使用して、次の 2 つの環境変数を作成します。
BRAZE_API_KEYBRAZE_API_URL
ステップ 3: オンサイトトラッキングを有効にする
まず、Braze Web SDK を初期化します。これは、NPMパッケージをインストールして実行することをお勧めします。
1
2
3
npm install --save @braze/web-sdk@5.4.0
# or, using yarn:
# yarn add @braze/web-sdk
Braze Web SDK バージョンは 5.4.0 である必要があります。
次に、最上位キーとしてこの設定を vite.config.js ファイルに含めます。
1
2
3
optimizeDeps: {
    exclude: ['@braze/web-sdk']
}
NPMパッケージをインストールした後、Layout コンポーネント内部のuseEffect フック内でSDKを初期化する必要がある。Hydrogen のバージョンに応じて、このコンポーネントはroot.jsx または layout.jsx のいずれかのファイルにあります。
1
2
3
4
5
6
7
8
9
10
11
12
13
14
15
16
17
18
19
20
21
// Add these imports
import * as braze from "@braze/web-sdk";
import { useEffect } from 'react';

export function Layout({children}) {
  const nonce = useNonce();
  // @type {RootLoader}
  const data = useRouteLoaderData('root');

  // Add useEffect call to initialize Braze SDK
  useEffect(() => {
    if(!braze.isInitialized()) {
      braze.initialize(data.brazeApiKey, {
        baseUrl: data.brazeApiUrl,
      });
      braze.openSession()
    }
  }, [data])

  return (...);
}
ステップ 2 で作成した環境変数を使用して、値 data.brazeApiKey と data.brazeApiUrl をコンポーネントローダーに含める必要があります。
1
2
3
4
5
6
7
8
9
10
11
12
13
14
15
16
17
18
19
20
21
22
23
24
25
26
27
28
29
30
export async function loader(args) {
  // Start fetching non-critical data without blocking time to first byte
  const deferredData = loadDeferredData(args);

  // Await the critical data required to render initial state of the page
  const criticalData = await loadCriticalData(args);

  const {storefront, env} = args.context;

  return {
    ...deferredData,
    ...criticalData,
    publicStoreDomain: env.PUBLIC_STORE_DOMAIN,
    // Add the two properties below to the returned value
    brazeApiKey: env.BRAZE_API_KEY,
    brazeApiUrl: env.BRAZE_API_URL,
    shop: getShopAnalytics({
      storefront,
      publicStorefrontId: env.PUBLIC_STOREFRONT_ID,
    }),
    consent: {
      checkoutDomain: env.PUBLIC_CHECKOUT_DOMAIN,
      storefrontAccessToken: env.PUBLIC_STOREFRONT_API_TOKEN,
      withPrivacyBanner: false,
      // Localize the privacy banner
      country: args.context.storefront.i18n.country,
      language: args.context.storefront.i18n.language,
    },
  };
}
コンテンツセキュリティポリシー(通常はentry.server.jsx Hydrogenファイルにある)は、ローカライゼーション環境でも本番環境でも、Brazeスクリプトの機能に影響を与える可能性がある。Oxygen またはカスタムデプロイメントを介して Shopify に送信されるプレビュービルドによるテストをお勧めします。問題が発生した場合は、CSP を設定してJavaScript が機能するようにする必要があります。
ステップ 4: Shopify アカウントログインイベントの追加
買い物客が自分のアカウントにサインインし、自分のユーザー情報を Braze に同期した時点を追跡します。これには、changeUser メソッドを呼び出して、Braze external ID を持つ顧客を識別することが含まれます。
現在のところ、Brazeのカスタム外部IDをサポートするガイダンスはない。今すぐ統合にこれが必要な場合は、カスタマーサクセスマネージャーに連絡してください。
開始する前に、Hydrogen 内で動作する顧客ログインのコールバック URI が設定されていることを確認します。詳細については、Hydrogen を使用したカスタマーアカウント API の使用を参照してください。
- コールバックURIを設定した後、Braze SDKを呼び出す関数を定義する。新しいファイル (
Tracking.jsxなど) を作成し、コンポーネントからインポートします。
1
2
3
4
5
6
7
8
9
10
11
12
13
14
15
16
17
18
19
20
21
22
23
24
25
26
27
28
29
30
31
32
33
34
35
import * as braze from "@braze/web-sdk";

export function trackCustomerLogin(customerData, storefrontUrl) {
  const customerId = customerData.id.substring(customerData.id.lastIndexOf('/') + 1)
  const customerSessionKey = `ab.shopify.shopify_customer_${customerId}`;
  const alreadySetCustomerInfo = sessionStorage.getItem(customerSessionKey);

  if(!alreadySetCustomerInfo) {
    const user = braze.getUser()

    // To use Shopify customer ID as Braze External ID, use:
    // braze.changeUser(customerId)

    // To use Shopify customer email as Braze External ID, use:
      // braze.changeUser(customerData.emailAddress?.emailAddress)
        // To use hashing for email addresses, apply hashing before calling changeUser

    // To use your own custom ID as the Braze External ID, pass that value to the changeUser call.

    user.setFirstName(customerData.firstName);
    user.setLastName(customerData.lastName);
    if(customerData.emailAddress.emailAddress) {
      user.setEmail(customerData.emailAddress?.emailAddress);
    }

    if(customerData.phoneNumber?.phoneNumber) {
      user.setPhoneNumber(customerData.phoneNumber?.phoneNumber);
    }
    braze.logCustomEvent(
      "shopify_account_login",
      { source: storefrontUrl }
    )
    sessionStorage.setItem(customerSessionKey, customerId);
  }
}
2.Braze SDK を初期化するのと同じuseEffect フックで、この関数の呼び出しを追加します。
1
2
3
4
5
6
7
8
9
10
11
12
13
14
15
16
17
18
19
20
21
22
23
24
import { trackCustomerLogin } from './Tracking';

export function Layout({children}) {
  const nonce = useNonce();
  // @type {RootLoader}
  const data = useRouteLoaderData('root');

  useEffect(() => {
    if(!braze.isInitialized()) {
      braze.initialize(data.brazeApiKey, {
        baseUrl: data.brazeApiUrl,
        enableLogging: true,
      });
      braze.openSession()
    }

    // Add call to trackCustomerLogin function
    data.isLoggedIn.then((isLoggedIn) => {
      if(isLoggedIn) {
        trackCustomerLogin(data.customerData, data.publicStoreDomain)
      }
    })

  }, [data])
3.ファイル app/graphql/customer-account/CustomerDetailsQuery.js にある顧客 API GraphQL クエリで、顧客のメールアドレスと電話番号を取得します。
1
2
3
4
5
6
7
8
9
10
11
12
13
14
15
16
17
18
19
20
21
22
23
24
25
26
27
28
29
30
31
32
33
34
35
export const CUSTOMER_FRAGMENT = `#graphql
  fragment Customer on Customer {
    id
    firstName
    lastName
    emailAddress {
      emailAddress
    }
    phoneNumber {
      phoneNumber
    }
    defaultAddress {
      ...Address
    }
    addresses(first: 6) {
      nodes {
        ...Address
      }
    }
  }
  fragment Address on CustomerAddress {
    id
    formatted
    firstName
    lastName
    company
    address1
    address2
    territoryCode
    zoneCode
    city
    zip
    phoneNumber
  }
`;
4.最後に、ローダー関数に顧客データを読み込みます。
1
2
3
4
5
6
7
8
9
10
11
12
13
14
15
16
17
18
19
20
21
22
23
24
25
26
27
28
29
30
31
32
33
34
35
36
37
38
39
40
41
42
43
44
45
46
// Add import for GraphQL Query
import { CUSTOMER_DETAILS_QUERY } from './graphql/customer-account/CustomerDetailsQuery';

export async function loader(args) {
  // Start fetching non-critical data without blocking time to first byte
  const deferredData = loadDeferredData(args);

  // Await the critical data required to render initial state of the page
  const criticalData = await loadCriticalData(args);

  const {storefront, env} = args.context;

  // Add GraphQL call to Customer API
  const isLoggedIn = await deferredData.isLoggedIn;
  let customerData;
  if (isLoggedIn) {
    const { data, errors } = await args.context.customerAccount.query(
        CUSTOMER_DETAILS_QUERY,
    );
    customerData = data.customer
  } else {
    customerData = {}
  }

  return {
    ...deferredData,
    ...criticalData,
    publicStoreDomain: env.PUBLIC_STORE_DOMAIN,
    brazeApiKey: env.BRAZE_API_KEY,
    brazeApiUrl: env.BRAZE_API_URL,
    // Add the property below to the returned value
    customerData: customerData,
    shop: getShopAnalytics({
      storefront,
      publicStorefrontId: env.PUBLIC_STOREFRONT_ID,
    }),
    consent: {
      checkoutDomain: env.PUBLIC_CHECKOUT_DOMAIN,
      storefrontAccessToken: env.PUBLIC_STOREFRONT_API_TOKEN,
      withPrivacyBanner: false,
      // Localize the privacy banner
      country: args.context.storefront.i18n.country,
      language: args.context.storefront.i18n.language,
    },
  };
}
ステップ 5: 製品の閲覧イベントとカートの更新イベントのトラッキングを追加する
製品の閲覧イベント
- この関数を
Tracking.jsxファイルに追加します。
1
2
3
4
5
6
7
8
9
10
11
12
13
14
15
16
17
18
19
20
21
export function trackProductViewed(product, storefrontUrl) {
  const eventData = {
    product_id: product.id.substring(product.id.lastIndexOf('/') + 1),
    product_name: product.title,
    variant_id: product.selectedOrFirstAvailableVariant.id.substring(product.selectedOrFirstAvailableVariant.id.lastIndexOf('/') + 1),
    image_url: product.selectedOrFirstAvailableVariant.image?.url,
    product_url: `${storefrontUrl}/products/${product.handle}`,
    price: product.selectedOrFirstAvailableVariant.price.amount,
    currency: product.selectedOrFirstAvailableVariant.price.currencyCode,
    source: storefrontUrl,
    type: ["price_drop", "back_in_stock"],
    metadata: {
    sku: product.selectedOrFirstAvailableVariant.sku
  }

  }
  braze.logCustomEvent(
    "ecommerce.product_viewed",
    eventData
  )
}
2.ユーザーが製品ページにアクセスするたびに前の関数を呼び出すには、ファイル app/routes/products.$handle.jsx 内の製品コンポーネントに useEffect フックを追加します。
1
2
3
4
5
6
7
8
9
10
11
12
13
14
15
import { trackProductViewed } from '~/tracking';
import { useEffect } from 'react';

export default function Product() {
  // @type {LoaderReturnData}
  // retrieve storefrontUrl to be passed into trackProductViewed
  const {product, storefrontUrl} = useLoaderData();

  // Add useEffect hook for tracking product_viewed event
  useEffect(() => {
    trackProductViewed(product, storefrontUrl)
  }, [])

  return (...)
}
3.storefrontUrl” の値を追加する (デフォルトではコンポーネントローダーにないため)
1
2
3
4
5
6
7
8
9
10
11
12
13
14
15
16
17
18
19
20
21
22
23
24
25
async function loadCriticalData({context, params, request}) {
  const {handle} = params;
  const {storefront} = context;

  if (!handle) {
    throw new Error('Expected product handle to be defined');
  }

  const [{product}] = await Promise.alll([
    storefront.query(PRODUCT_QUERY, {
      variables: {handle, selectedOptions: getSelectedProductOptions(request)},
    }),
    // Add other queries here, so that they are loaded in parallel
  ]);

  if (!product?.id) {
    throw new Response(null, {status: 404});
  }

  return {
    product,
   // Add this property to the returned value
    storefrontUrl: context.env.PUBLIC_STORE_DOMAIN,
  };
}
カート更新済みイベント
cart_updated イベントの追跡に加えて、カートトークン値を Braze に送信する必要があります。Shopify から受け取った注文 Webhook の処理にカートトークン値を使用します。これを行うには、Shopify カートトークンを名前とするユーザーエイリアスを作成します。
cart_updatedイベントを追跡し、カートトークンを設定する関数を定義します。
1
2
3
4
5
6
7
8
9
10
11
12
13
14
15
16
17
18
19
20
21
22
23
24
25
26
27
28
29
30
31
32
33
34
35
36
37
38
39
40
41
export function trackCartUpdated(cart, storefrontUrl) {
  const eventData = {
    cart_id: cart.id,
    total_value: cart.cost.totalAmount.amount,
    currency: cart.cost.totalAmount.currencyCode,

    products: cart.lines.nodes.map((line) => {
      return {
        product_id: line.merchandise.product.id.toString(),
        product_name: line.merchandise.product.title,
        variant_id: line.merchandise.id.toString(),
        image_url: line.merchandise.image.url,
        product_url: `${storefrontUrl}/products/${line.merchandise.product.handle}`,
        quantity: Number(line.quantity),
        price: Number(line.cost.totalAmount.amount / Number(line.quantity))
      }
    }),
    source: storefrontUrl,
    metadata: {},
  };

  braze.logCustomEvent(
    "ecommerce.cart_updated",
    eventData
  )
}

export function setCartToken(cart) {
  const cartId = cart.id.substring(cart.id.lastIndexOf('/') + 1)
  const cartToken = cartId.substring(0, cartId.indexOf("?key="));
  if (cartToken) {
    const cartSessionKey = `ab.shopify.shopify_cart_${cartToken}`;
    const alreadySetCartToken = sessionStorage.getItem(cartSessionKey);

    if (!alreadySetCartToken) {
      braze.getUser().addAlias("shopify_cart_token", `shopify_cart_${cartToken}`)
      braze.requestImmediateDataFlush();
      sessionStorage.setItem(cartSessionKey, cartToken);
    }
  }
}
2.フェッチャーアクションから cart オブジェクトを返し、app/routes/cart.jsx ファイルに移動して action に以下を追加することで、Braze がそのプロパティにアクセスできるようにします。
関数
1
2
3
4
5
6
7
8
9
10
11
12
13
14
15
16
17
18
19
20
21
22
23
24
25
26
27
28
29
30
31
32
33
34
35
36
37
export async function action({request, context}) {
  const {cart} = context;

  ...

  switch (action) {
    case CartForm.ACTIONS.LinesAdd:
      result = await cart.addLines(inputs.lines);
      break;
    ...
  }

  const cartId = result?.cart?.id;
  const headers = cartId ? cart.setCartId(result.cart.id) : new Headers();
  const {cart: cartResult, errors, warnings} = result;

  const redirectTo = formData.get('redirectTo') ?? null;
  if (typeof redirectTo === 'string') {
    status = 303;
    headers.set('Location', redirectTo);
  }

  return data(
    {
      cart: cartResult,
      // Add these two properties to the returned value
      updatedCart: await cart.get(),
      storefrontUrl: context.env.PUBLIC_STORE_DOMAIN,
      errors,
      warnings,
      analytics: {
        cartId,
      },
    },
    {status, headers},
  );
}
Remix フェッチャーの詳細については、useFetcherをを参照してください。
3.Hydrogen ストアは通常、カートオブジェクトの状態を管理する CartForm コンポーネントを定義します。このコンポーネントは、カート内のアイテムの追加、削除、数量の変更時に使用されます。フォームフェッチャーの状態が変わるたびに (ユーザーカートが更新されるたびに) trackCartUpdated 関数を呼び出す useEffect フックを AddToCartButton コンポーネントに追加します。
1
2
3
4
5
6
7
8
9
10
11
12
13
14
15
16
17
18
19
20
21
22
23
24
25
26
27
28
29
30
31
32
33
34
35
36
37
38
39
40
41
42
43
44
45
46
// Add imports
import { trackCartUpdated, setCartToken } from '~/tracking';
import { useEffect } from 'react';
import { useFetcher } from '@remix-run/react';

export function AddToCartButton({
  analytics,
  children,
  disabled,
  lines,
  onClick,
}) {

  // Define a new Fetcher to be used for tracking cart updates
  const fetcher = useFetcher({ key: "cart-fetcher" });

  // Add useEffect hook for tracking cart_updated event and setting cart token alias
  useEffect(() => {
    if(fetcher.state === "idle" && fetcher.data) {
      trackCartUpdated(fetcher.data.updatedCart, fetcher.data.storefrontUrl)
      setCartToken(fetcher.data.updatedCart);
    }
  }, [fetcher.state, fetcher.data])

  // Add the fetcherKey prop to the CartForm component
  return (
    <CartForm route="/cart" inputs= fetcherKey="cart-fetcher" action={CartForm.ACTIONS.LinesAdd}>
      {(fetcher) => (
        <>
          <input
            name="analytics"
            type="hidden"
            value={JSON.stringify(analytics)}
          />
          <button
            type="submit"
            onClick={onClick}
            disabled={disabled ?? fetcher.state !== 'idle'}
          >
            {children}
          </button>
        </>
      )}
    </CartForm>
  );
}
4.カートから既存の製品を更新するアクションには、同じ fetcherKey を使用します。CartLineRemoveButton とCartLineUpdateButton コンポーネント (デフォルトではファイル app/components/CartLineItem.jsx にある) に以下を追加します。
1
2
3
4
5
6
7
8
9
10
11
12
13
14
15
16
17
18
19
20
21
22
23
24
25
26
27
28
29
function CartLineRemoveButton({lineIds, disabled}) {
  // Add the fetcherKey prop to the CartForm component
  return (
    <CartForm
      fetcherKey="cart-fetcher"
      route="/cart"
      action={CartForm.ACTIONS.LinesRemove}
      inputs=
    >
      <button disabled={disabled} type="submit">
        Remove
      </button>
    </CartForm>
  );
}

function CartLineUpdateButton({children, lines}) {
  // Add the fetcherKey prop to the CartForm component
  return (
    <CartForm
      route="/cart"
      fetcherKey="cart-fetcher"
      action={CartForm.ACTIONS.LinesUpdate}
      inputs=
    >
      {children}
    </CartForm>
  );
}
Braze の Shopify 統合をインストールする
ステップ 1: Shopify ストアを接続する
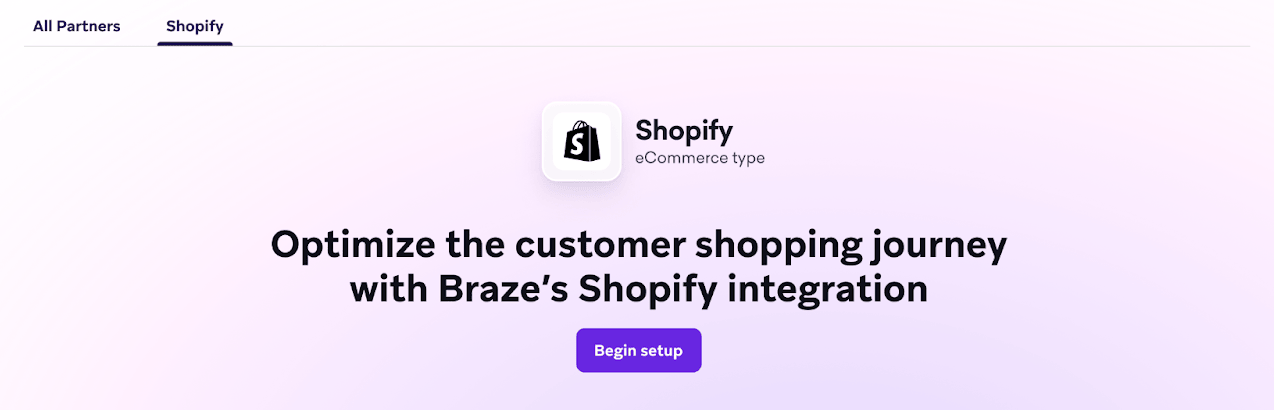
Shopify パートナーページに移動して設定を開始します。まず、[Begin Setup] を選択し、Shopify App Storeから Braze アプリケーションをインストールします。ガイドの手順に従って、インストールプロセスを完了します。
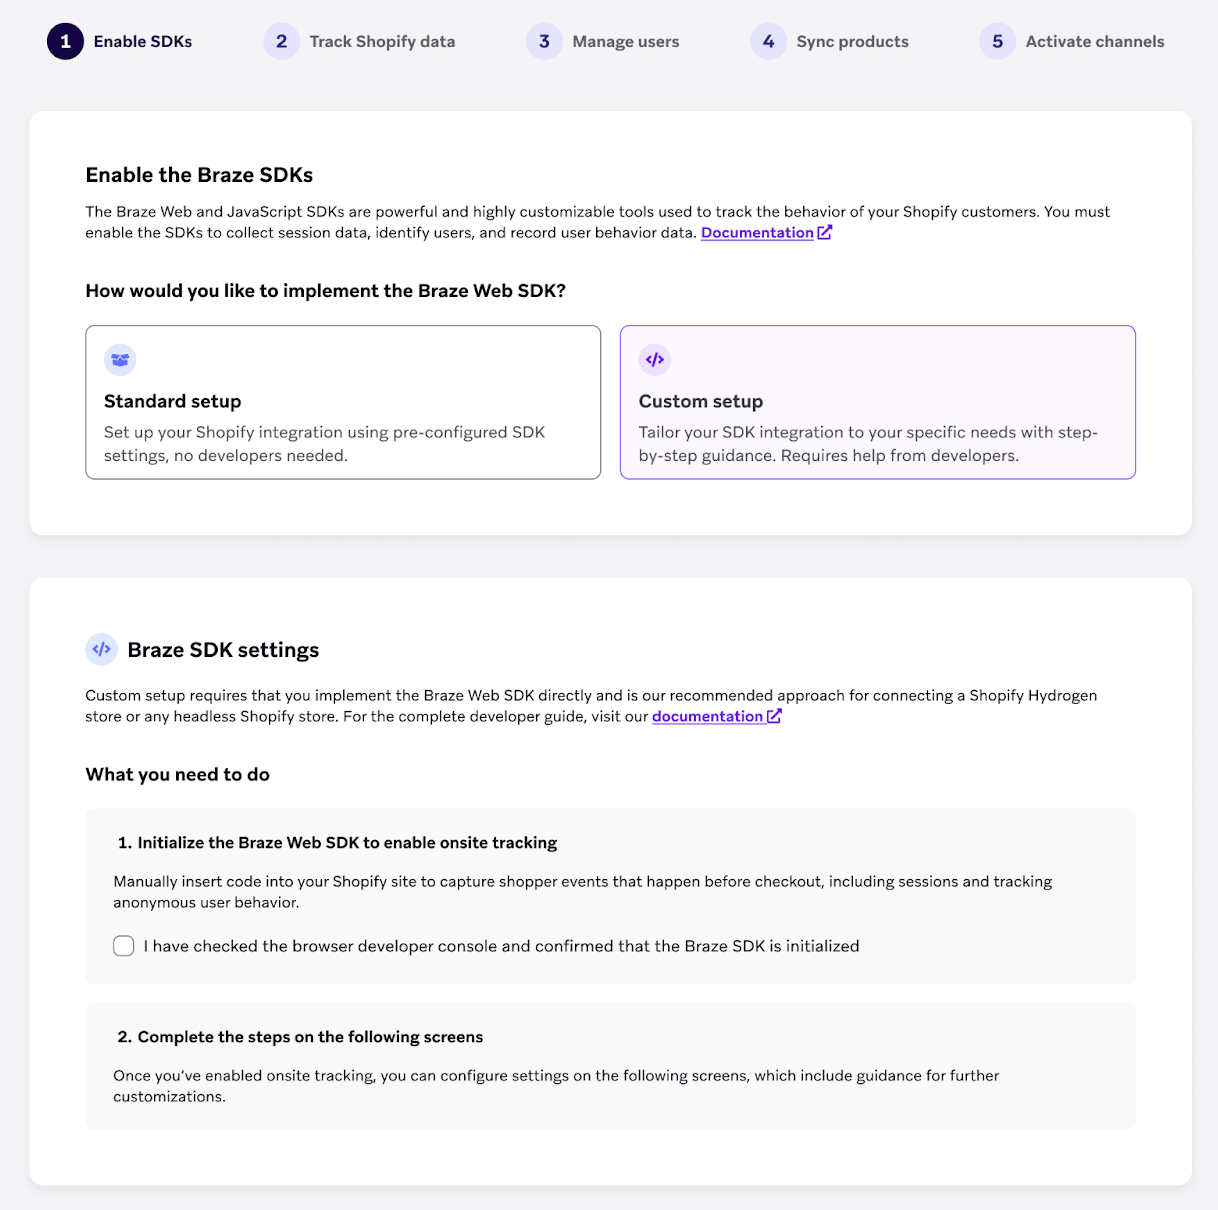
ステップ 2:Braze SDK を有効にする
Shopify Hydrogen またはヘッドレスストアの場合は、[カスタム設定] オプションを選択します。
オンボーディングプロセスを続行する前に、Shopify Web サイトで Braze SDK が有効になっていることを確認します。
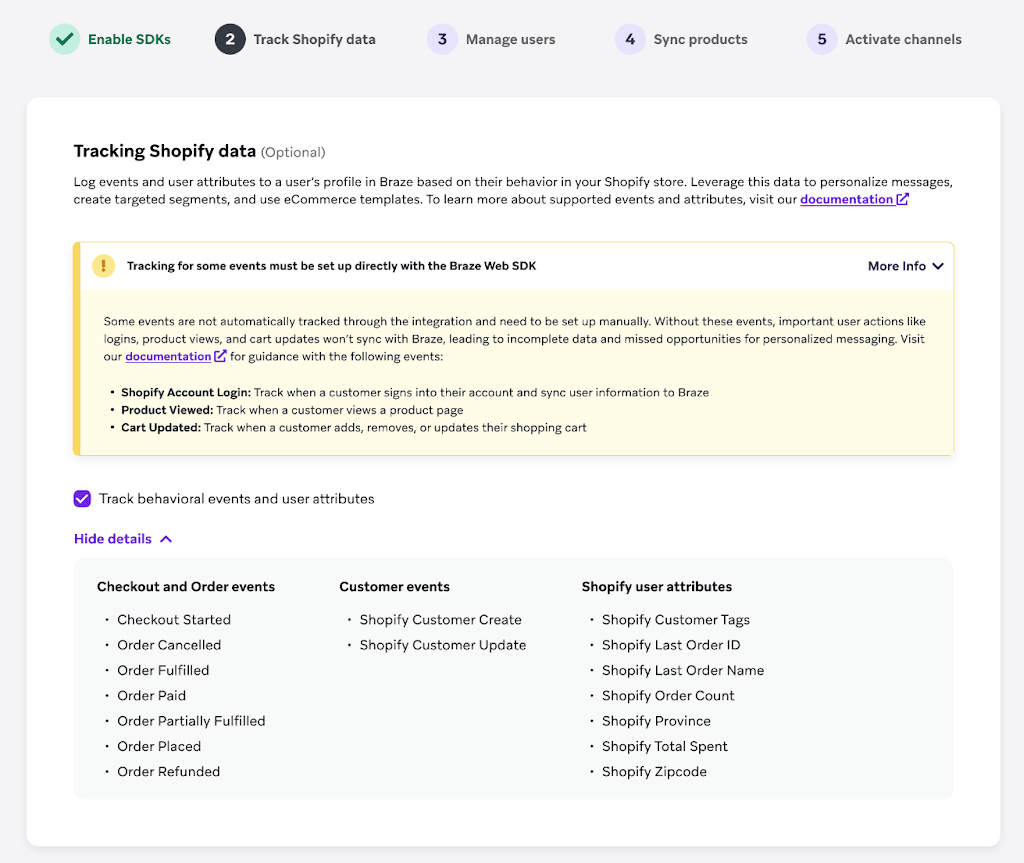
ステップ 3:Shopify データを追跡する
Shopify の Webhook が利用する Shopify イベントと属性をさらに追加することで、統合を強化します。この統合によって追跡されるデータの詳細については、Shopify Data Features を参照してください。
ステップ 4: 履歴バックフィル (オプション)
カスタム設定を通じて、Shopify 統合を接続する前に、過去 90 日間の Shopify の顧客と注文を読み込むオプションがあります。この初期データ読み込みを含めるには、初期データ読み込みオプションのチェックボックスをオンにします。
後でバックフィルを実行する場合は、ここで初期セットアップを完了し、後でこのステップに戻ることができます。

この表には、バックフィルによって最初に読み込まれるデータが掲載されています。
| Brazeおすすめイベント | Shopify カスタムイベントs | Braze の標準属性項目 | Braze サブスクリプションステータス |
|---|---|---|---|
|
|
|
|
ステップ 5: 顧客データトラッキングの設定 (高度)
Braze SDK を使用すると、この統合でサポートされているデータを超えるカスタムイベントやカスタム属性を追跡することができます。カスタムイベントは、以下のようなストアでの固有のインタラクションをキャプチャします。
| カスタムイベント | カスタム属性 |
|---|---|
|
|
イベントやカスタム属性をログに記録するには、SDKがユーザーのデバイス上で初期化(アクティビティをリッスン)されている必要がある。カスタムデータのロギングについては、ユーザーオブジェクトと logCustomEvent を参照してください。
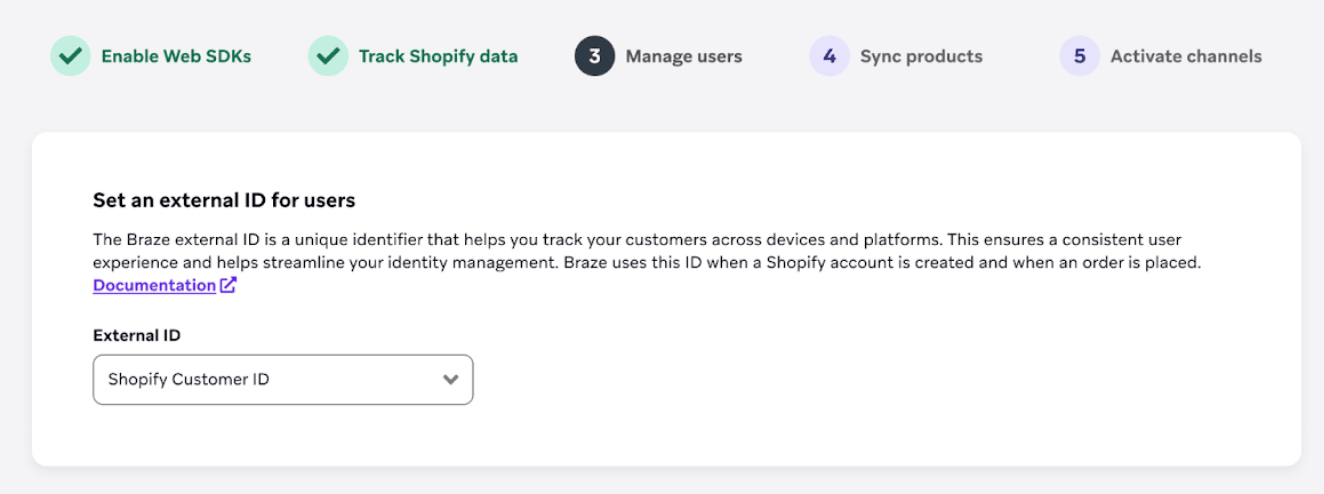
ステップ 6: ユーザーの管理方法の設定(オプション)
ドロップダウンから external_id タイプを選択します。
メールアドレスまたはハッシュ化されたメールアドレスを Braze external ID として使用することで、データソース全体での ID 管理を簡素化できます。ただし、ユーザーのプライバシーとデータセキュリティに対する潜在的なリスクを考慮することが重要です。
- 推測可能な情報:メールアドレスは推測されやすく、攻撃されやすい。
- 悪用のリスク:悪意のあるユーザーがWebブラウザーを改ざんし、他人のメールアドレスを外部IDとして送信した場合、機密メッセージやアカウント情報にアクセスされる可能性がある。
デフォルトでは、BrazeはメールsをShopifyから小文字に自動的に変換してから、外部IDとして使用します。メールまたはハッシュメールを外部IDとして使用している場合は、メールアドレスも小文字に変換されていることを確認してから、外部IDとして割り当てるか、他のデータソースからハッシュする必要があります。これにより、外部ID の不一致を防ぎ、Braze での重複ユーザープロファイルの作成を回避できます。
次に表示されるステップは、外部ID の選択によって異なります。
- カスタム外部ID タイプを選択した場合:ステップ6.1-6.3を実行して、カスタム外部ID設定を設定します。
- Shopify 顧客 ID、メール、またはハッシュメールを選択した場合:ステップ 6.1~6.3をスキップし、ステップ 6.4に進みます。
ステップ6.1: braze.external_id メタフィールドを作成する
- Shopifyの管理パネルで、Settings> Meta フィールド s に移動します。
- Customers> 定義を追加を選択します。
- 名前空間とキーには
braze.external_idと入力します。 - TypeにはID Typeを選択します。
メタフィールドが作成されたら、顧客s に入力します。次のアプリ侵害をお勧めします。
- 顧客作成webhookを聴く:
customer/createevents をリッスンするWebhookを設定します。これにより、新しい顧客の作成時にメタフィールドを書き込むことができます。 - 顧客を埋め戻す:Admin APIまたは顧客 APIを使用して、以前に作成した顧客sのメタフィールドを埋め戻します。
ステップ6.2: 外部ID を取得するエンドポイントを作成する
外部ID を取得するためにBraze が呼び出すことができる公開エンドポイントを作成する必要があります。これにより、Brazeは、Shopifyがbraze.external_idメタフィールドを直接的に提供できない場合にIDを取得できます。
エンドポイント仕様
メソッド:GET
Brazeは、次のパラメータをエンドポイントに送信します。
| パラメーター | 必須かどうか | データ型 | 説明 |
|---|---|---|---|
| shopify_customer_id | はい | string | Shopify 顧客 ID。 |
| shopify_storefront | はい | string | リクエストのストアフロント名。例: <storefront_name>.myshopify.com |
| email_address | いいえ | string | ログインユーザーのメールの住所。 このフィールドは、特定のWebhook状況で欠落している可能性があります。エンドポイントロジックでは、ここでNULL 値を考慮する必要があります(たとえば、内部ロジックで必要な場合は、shopify_customer_id を使用してメールをフェッチします)。 |
サンプルエンドポイント
1
GET https://mystore.com/custom_id?shopify_customer_id=1234&email_address=bob@braze.com&shopify_storefront=dev-store.myshopify.com
期待される反応
Braze は、外部ID JSON を返すステータス コードに200 を期待します。
1
2
3
{
  "external_id": "my_external_id"
}
検証
shopify_customer_id とemail_address (存在する場合) がShopify の顧客 に一致することを検証することが重要です。 Shopify Admin API または Customer API を使用してこれらのパラメータを検証し、正しいbraze.external_id メタフィールドを取得できます。
障害動作とマージ
200 以外のステータス コードは失敗と見なされます。
- マージの影響:エンドポイントが失敗した場合(
200以外を返す、またはタイムアウトした場合)、Braze は外部ID を取得できません。したがって、Shopify ユーザーとBraze ユーザープロファイルの間のマージは、その時点でh en をアプリしません。 - 再試行ロジック:Brazeは、通常の即時ネットワーク再試行を試みることができますが、障害が継続する場合、マージは、次に該当するイベントまで延期されます(たとえば、次回ユーザー 更新がプロファイルを実行するか、チェックアウトを完了したとき)。
- サポート性:タイムリーなユーザーマージに対応するには、エンドポイントが高可用性であり、オプションの
email_addressフィールドを適切に処理する必要があります。
ステップ6.3:外部IDを入力
手順6を繰り返し、Brazeの外部ID 種別としてカスタム外部ID を選択した後、エンドポイント URL を入力します。
考慮事項
- Braze がエンドポイントにリクエストを送信したときに外部ID が生成されない場合、
changeUser関数が呼び出されると、インテグレーションはShopify 顧客 ID の使用をデフォルトします。このステップは、特定されたユーザープロファイルと匿名ユーザープロファイルをマージするために重要です。そのため、一時的にワークスペース内にさまざまなタイプの外部ID が存在する場合があります。 - 外部ID が
braze.external_idメタフィールドで使用可能な場合、この外部ID が優先され、割り当てられます。- 以前にShopify 顧客 ID がBraze 外部ID として設定されていた場合は、
braze.external_idメタフィールドに置き換えられます。
- 以前にShopify 顧客 ID がBraze 外部ID として設定されていた場合は、
ステップ6.4: Shopify からメールや SMS のオプトインを収集する (オプション)
Shopify からメールまたは SMS マーケティングのオプトインを収集する選択もできます。
メールや SMS チャネルを使用している場合、メールや SMS マーケティングのオプトイン状態を Braze に同期させることができます。Shopify からメールマーケティングオプトインを同期すると、Braze はその特定のストアに関連付けられているすべてのユーザのメールサブスクリプションググループを自動的に作成します。このサブスクリプショングループに一意の名前を作成する必要があります。
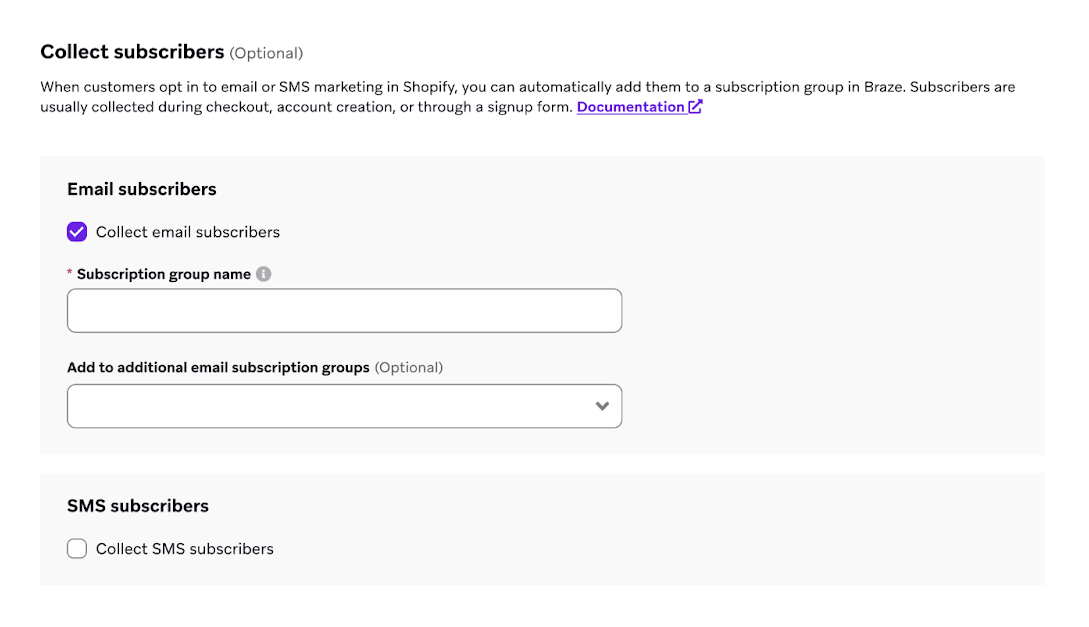
Shopify概要で説明されているように、サードパーティ製のキャプチャフォームを使用する場合は、開発者がBraze SDK コードを統合する必要があります。これにより、フォーム送信からメールアドレスとグローバルメール購読ステータスを取得できます。具体的には、theme.liquid ファイルにこれらのメソッドを実装してテストする必要があります。
- setEmail:ユーザープロファイルのメールアドレスを設定します
- setEmailNotificationSubscriptionType:グローバルメールサブスクリプションステータスを更新します
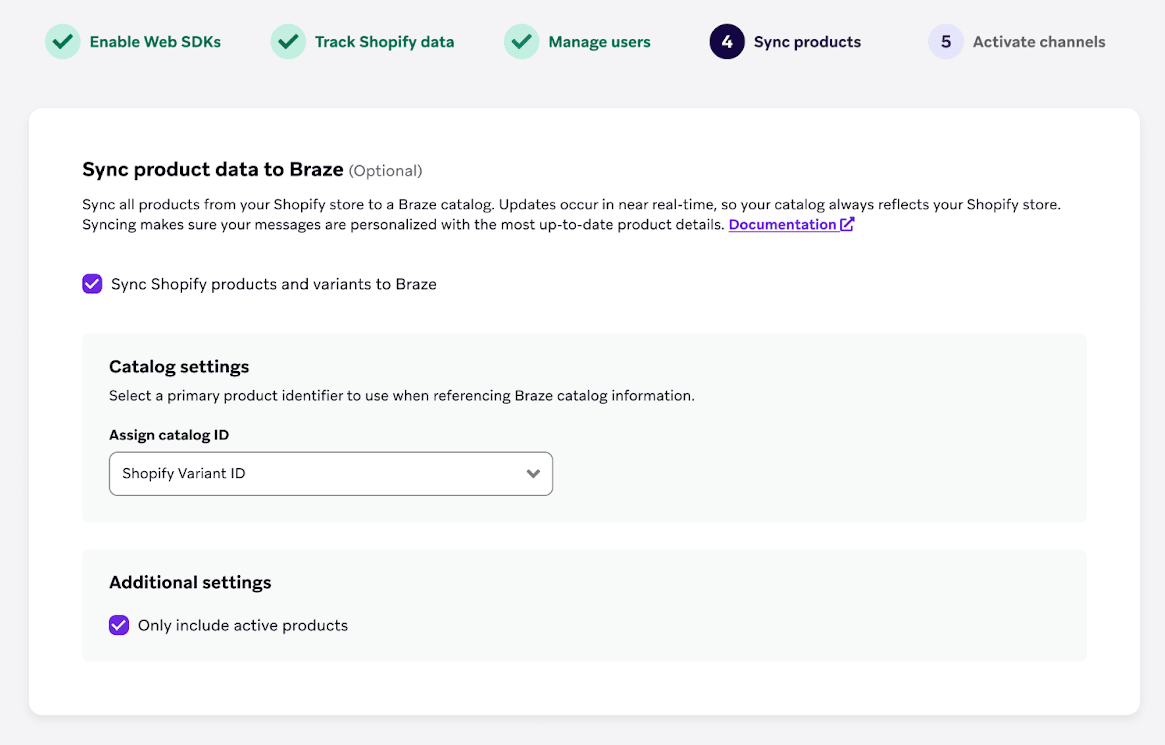
ステップ 7:製品を同期 (オプション)
Shopify ストアの全商品を Braze カタログに同期し、より詳細なメッセージングのパーソナライゼーションを実現できます。自動更新はほぼリアルタイムで行われるため、カタログには常に最新の商品詳細が反映されます。詳細は、Shopify product sync を参照してください。
ステップ 8:チャネルを有効にする
Shopify 直接統合を使用してアプリ内メッセージ、コンテンツカード、および機能フラグを有効にするには、各チャネルを SDK に追加します。次の各チャネルに提供されているドキュメントリンクに従ってください。
- アプリ内メッセージ:リード獲得フォームのユースケースでアプリ内メッセージを有効にするには、アプリ内メッセージを参照してください。
- コンテンツカード:受信トレイや Web サイトバナーのユースケースでコンテンツカードを有効にするには、コンテンツカードを参照してください。
- フィーチャーフラグ:サイト実験のユースケースでフィーチャーフラグを有効にする方法については、フィーチャーフラグを参照のこと。
ステップ 9:設定完了
すべてのステップを終えたら、設定を終了を選択してパートナーページに戻ります。次に、表示されるバナーに示されているように、Shopify 管理ページ でBraze アプリの埋め込みを有効にします。

サンプルコード
Shopify-hydrogen-example は、前のステップで説明したすべてのコードを含む Hydrogen アプリの例である。
 GitHub でこのページを編集