AppboyKit(Objective-C SDKとも呼ばれます)はもはやサポートされておらず、Swift SDK. 新しい機能、バグ修正、セキュリティー更新s、またはテクニカルサポートを受けません。ただし、メッセージングと分析は通常どおり機能し続けます。詳しくは、新しいBrazeの概要SDK]を参照してください。
基本的なプッシュ通知開発者統合ガイドをお探しの場合は、それを見つけろ here.
プッシュ通知実装ガイド
このオプションの高度な実装ガイドでは、プッシュ通知コンテンツアプリの拡張機能を活用してプッシュメッセージを最大限に活用する方法について説明します。私たちのチームが構築した3つのカスタムユースケース、付随するコードスニペット、およびロギング分析に関するガイダンスが含まれています。こちらから Braze Demo リポジトリにアクセスしてください。この実装ガイドは、Swift 実装を中心に扱っていますが、興味のある人のために Objective-C のスニペットが提供されています。
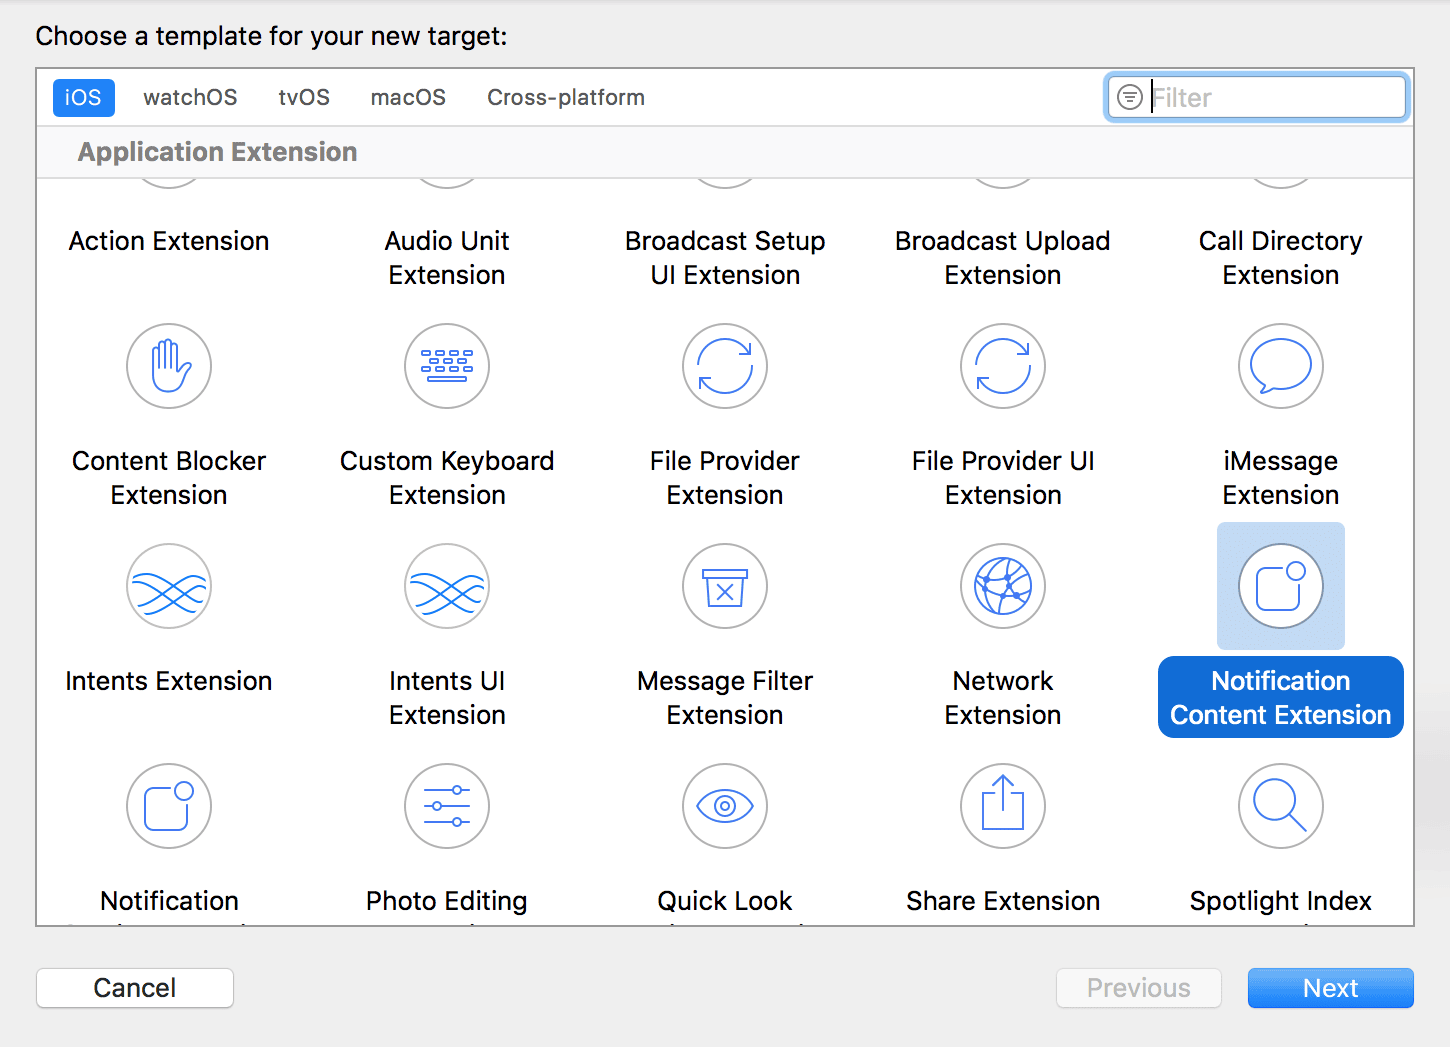
通知コンテンツアプリの拡張
 を実装して作成したコーヒーパンチカードプッシュが表示されます。
プッシュ通知は、さまざまなプラットフォームで標準のように思われるものの、デフォルトの UI に通常実装されているものを超えて、膨大なカスタマイズオプションが提供されています。プッシュ通知が展開されると、コンテンツ通知拡張により、展開されたプッシュ通知のカスタムビューが有効になります。
プッシュ通知は、次の 3 つの方法で展開できます。
- プッシュバナーを長押しする
- プッシュバナーを下にスワイプする
- バナーを左にスワイプし、[表示] を選択する
これらのカスタムビューでは、顧客を引き付けるスマートな方法が提供され、対話型の通知、ユーザーデータを含む通知、電話などの情報を取得できるプッシュメッセージなど、さまざまな種類のコンテンツを表示できます。この方法でプッシュを実装することに慣れていない人もいるかもしれませんが、Braze でよく知られている機能の1つである Push Stories は、通知コンテンツアプリ拡張機能のカスタムビューがどのように表示されるかを示す良い例です。
要件
- プッシュ通知がアプリに正常に統合されました
- iOS 10以上
- あなたのコーディング言語に基づいてXcodeが生成する以下のファイル:
Swift
NotificationViewController.swiftMainInterface.storyboard
Objective-CNotificationViewController.hNotificationViewController.mMainInterface.storyboard
カスタムカテゴリ設定
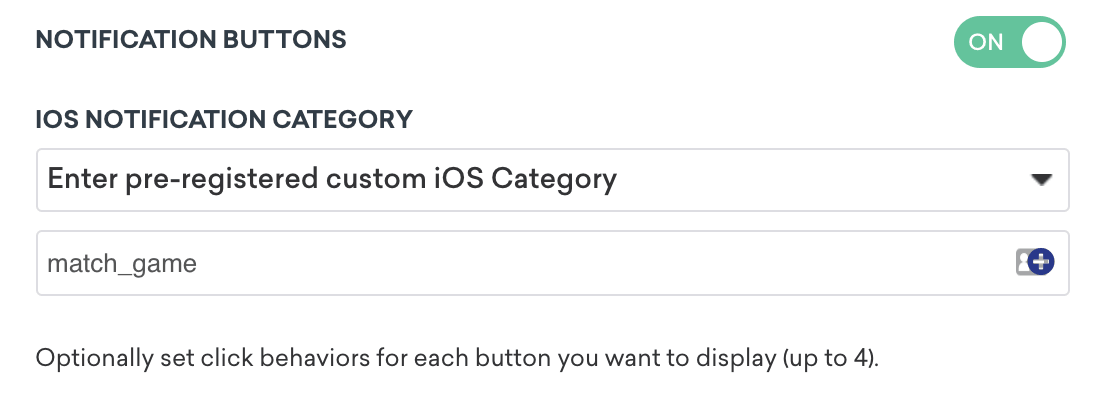
ダッシュボードでカスタムビューを設定するには、通知ボタンを切り替えてカスタムカテゴリーを入力する必要があります。指定したあらかじめ登録されたカスタムiOS カテゴリーは、通知コンテンツ拡張ターゲットの.plist のUNNotificationExtensionCategory と照合されます。ここで指定される値は、Braze ダッシュボードで設定されている値と一致する必要があります。


コンテンツ拡張を使用したプッシュは必ずしも明らかではないため、プッシュ通知を展開するようにユーザーに促すための行動喚起を含めることをお勧めします。
ユースケースと実装のチュートリアル
3つのプッシュ通知コンテンツアプリ拡張タイプが用意されています。各タイプには、概念のチュートリアル、潜在的なユースケース、および Braze ダッシュボードでプッシュ通知変数がどのように表示され、どのように使用されるかの考察があります。
インタラクティブなプッシュ通知
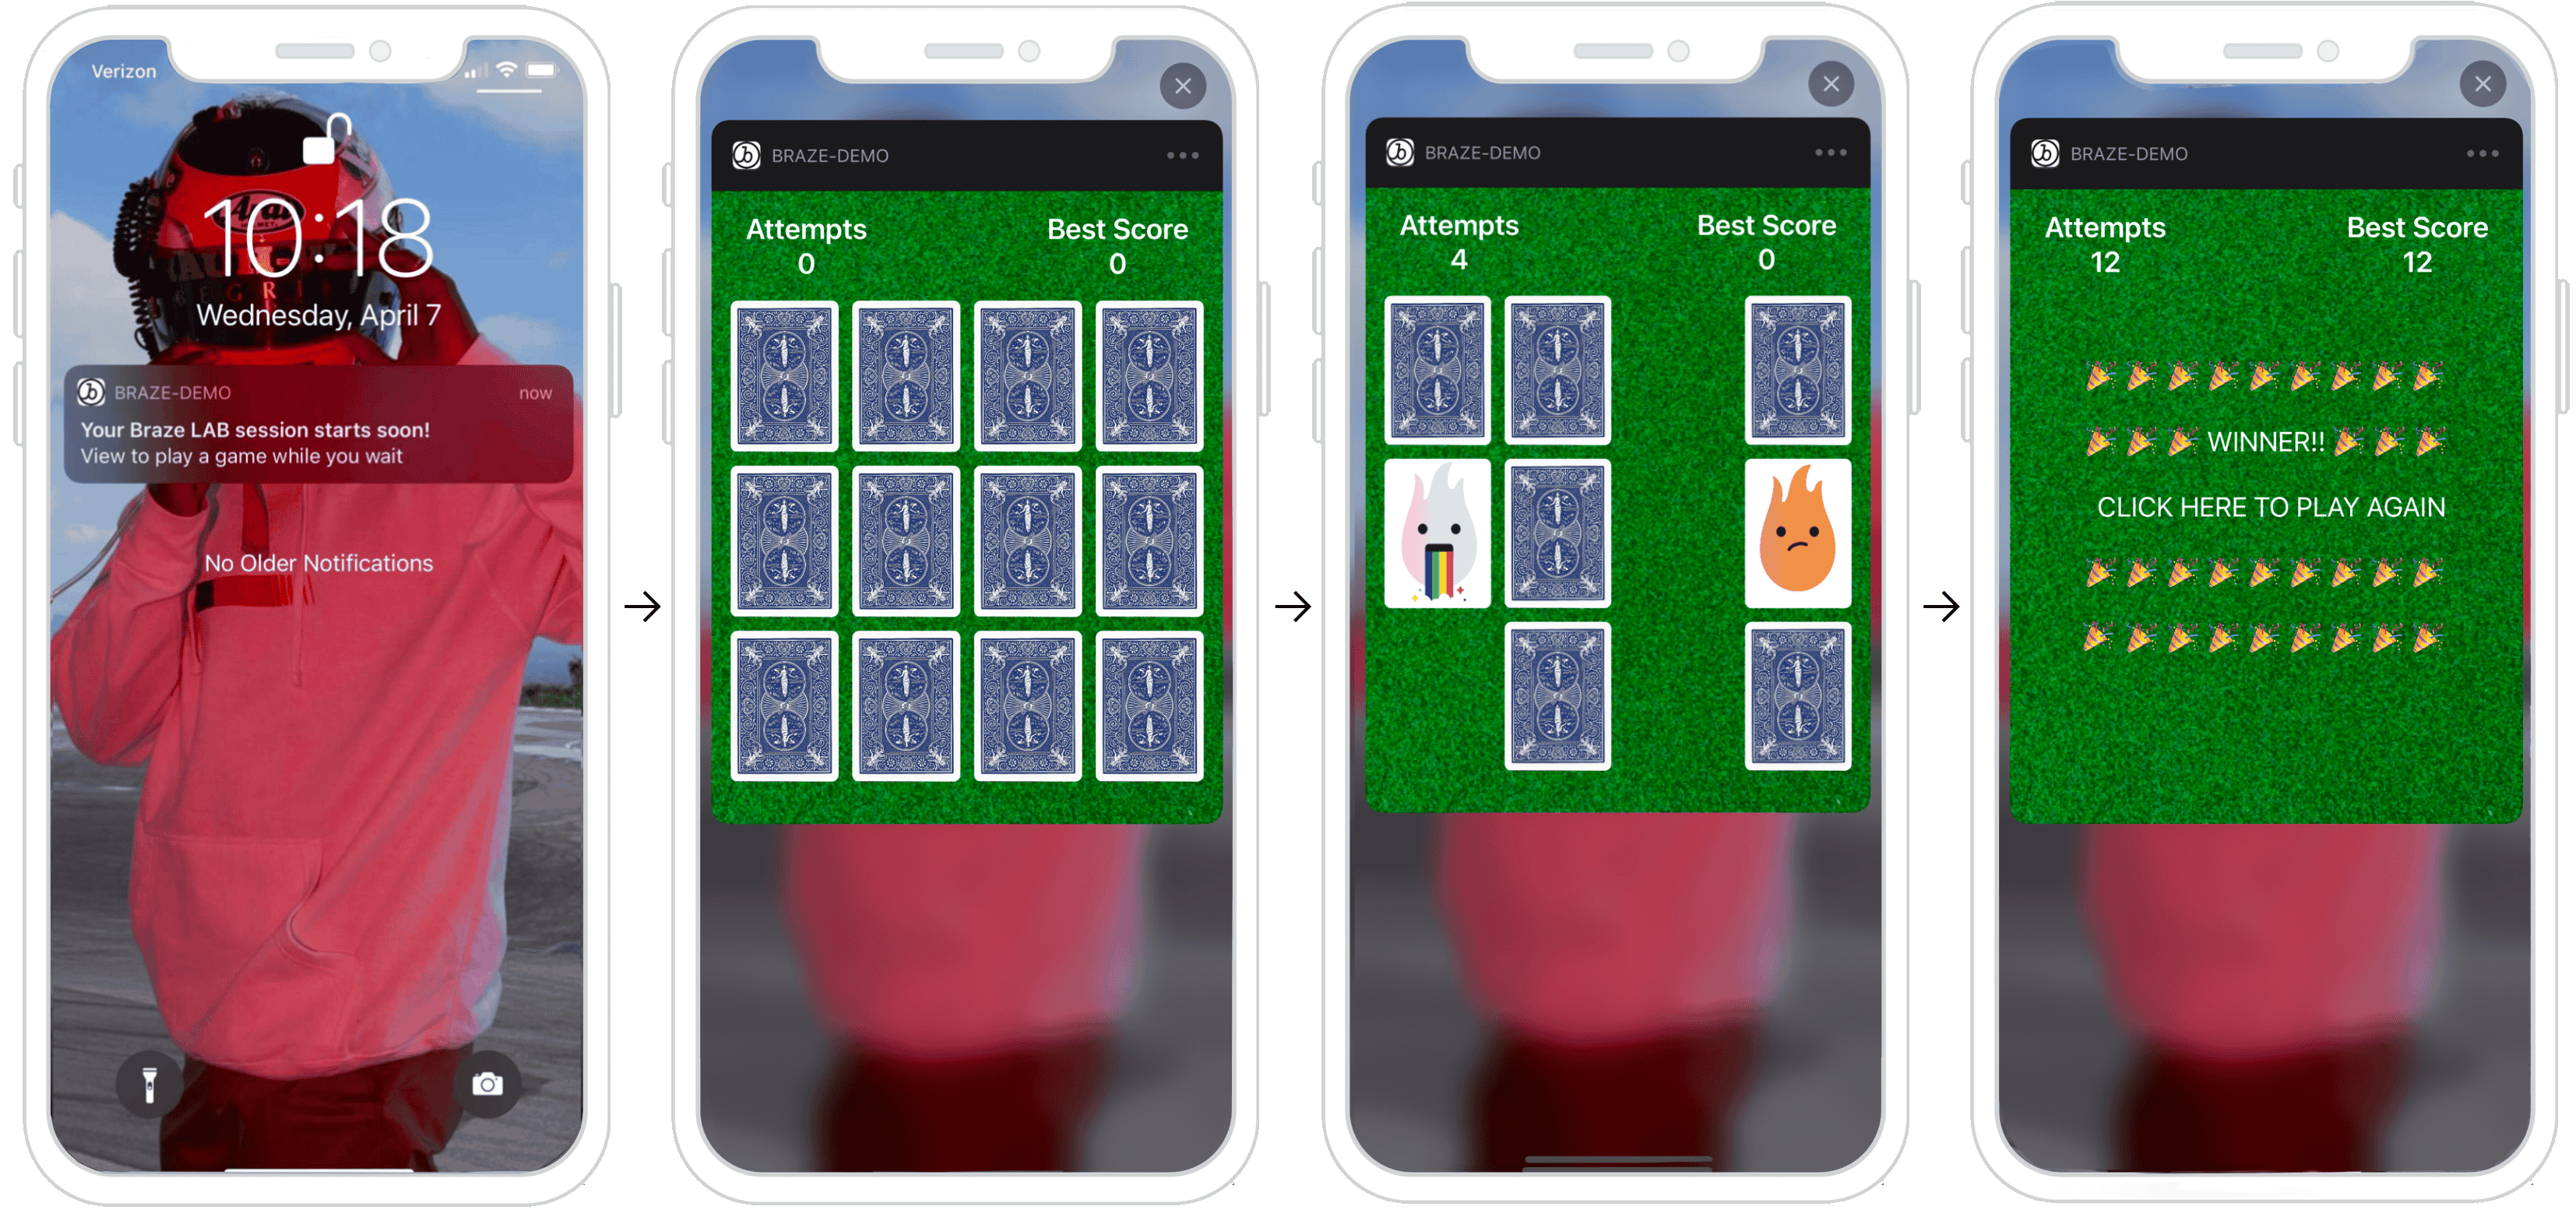
プッシュ通知は、コンテンツ拡張内のユーザアクションに応答できます。iOS 12以降を使用しているユーザーの場合、これはプッシュメッセージを完全にインタラクティブなプッシュ通知に変換できることを意味します。このインタラクティブな機能により、ユーザーを通知に引き付ける可能性が増します。次の例は、ユーザーが展開された通知内でマッチゲームをプレイできるプッシュ通知を示しています。
ダッシュボードの構成
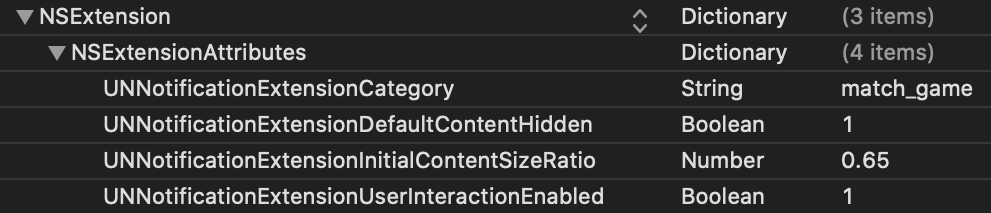
ダッシュボードでカスタムビューを設定するには、通知ボタン設定で表示する特定のカテゴリーを入力します。次に、通知コンテンツ拡張の.plist で、カスタムカテゴリーを UNNotificationExtensionCategory 属性に設定する必要があります。ここで指定される値は、Braze ダッシュボードで設定されている値と一致する必要があります。最後に、プッシュ通知でユーザインタラクションを有効にするには、UNNotificationExtensionInteractionEnabled キーを「true」に設定します。
その他のユースケース
プッシュコンテンツ拡張は、プロモーションやアプリケーションにインタラクティビティを導入するエキサイティングなオプションです。例としては、ユーザーがプレイできるゲーム、割引のためのスピン・トゥ・ウィン・ホイール、リストや曲を保存するための「いいね」ボタンなどがあります。
分析をログに記録する準備ができましたか?
以下のセクションを参照して、データのフローがどうあるべきかを理解してください。
パーソナライズされたプッシュ通知
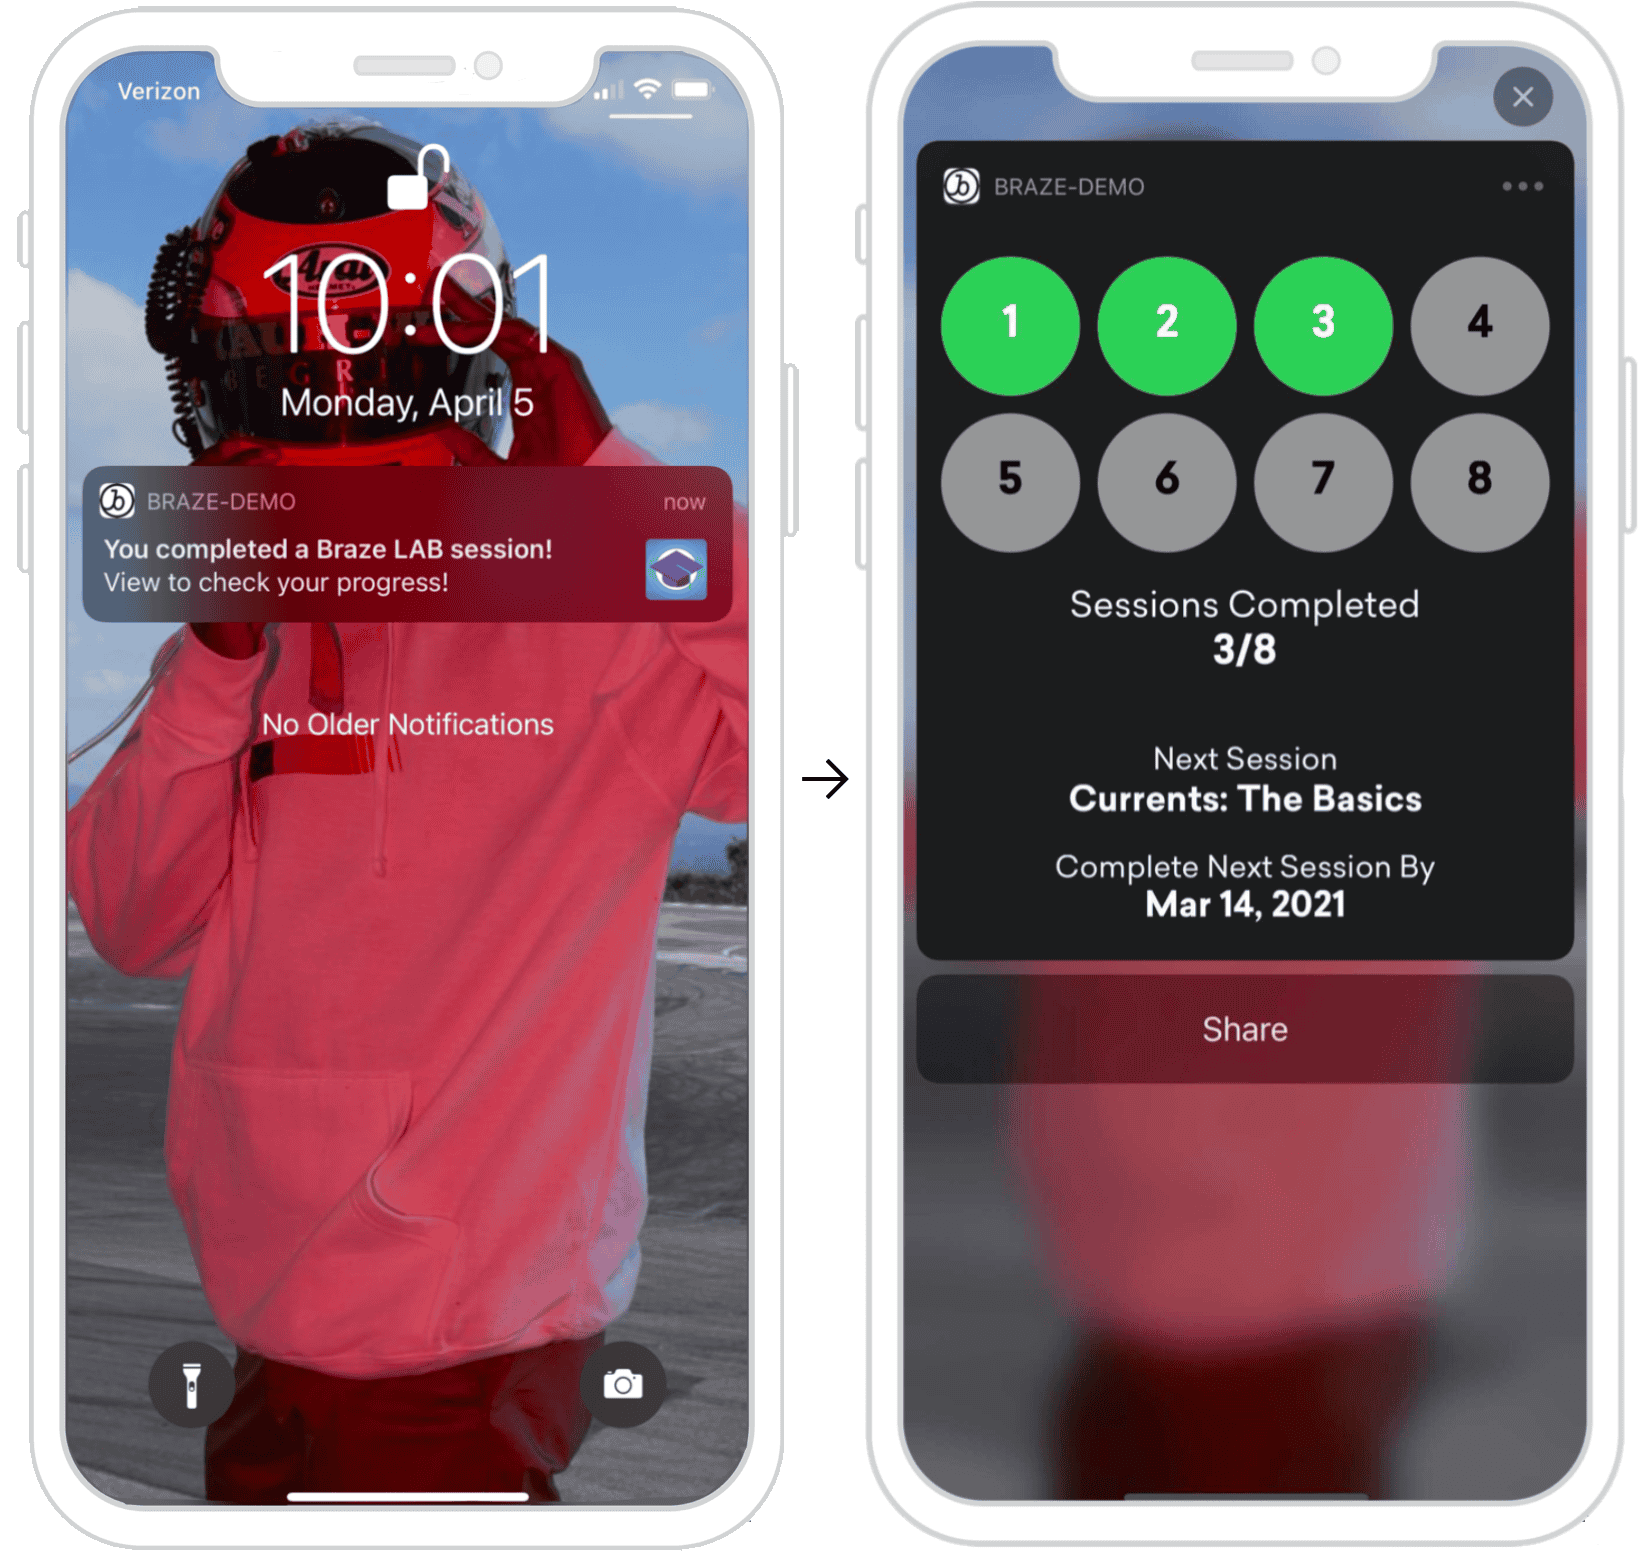
プッシュ通知では、コンテンツ拡張の内部にユーザ固有の情報を表示できます。右の例では、ユーザーが特定のタスク (Braze ラーニングコース) を完了し、この通知を展開して進捗状況を確認するように求められた後のプッシュ通知を示しています。ここで提供される情報はユーザー固有であり、セッションが完了するか、API トリガーを利用して特定のユーザーアクションが実行されたときに呼び出すことができます。
ダッシュボード設定
ダッシュボードでパーソナライズされたプッシュを設定するには、表示する特定のカテゴリーを登録し、標準の Liquid を使用してキーと値のペア内で、メッセージに表示する適切なユーザー属性を設定する必要があります。これらのビューは、特定のユーザープロファイルの特定のユーザー属性に基づいてカスタマイズできます。

キーと値のペアの処理
以下のメソッド didReceive は、コンテンツ拡張が通知を受け取ったときに呼び出され、NotificationViewController 内にあります。ダッシュボードで提供されるキーと値のペアは、userInfo 辞書を使用してコードで表されます。
プッシュ通知からのキーと値のペアの解析
1
2
3
4
5
6
7
8
9
func didReceive(_ notification: UNNotification) {
  let userInfo = notification.request.content.userInfo

  guard let value = userInfo["YOUR-KEY-VALUE-PAIR"] as? String,
        let otherValue = userInfo["YOUR-OTHER-KEY-VALUE-PAIR"] as? String,
  else { fatalError("Key-Value Pairs are incorrect.")}

  ...
}
1
2
3
4
5
6
7
8
9
10
11
- (void)didReceiveNotification:(nonnull UNNotification *)notification {
  NSDictionary *userInfo = notification.request.content.userInfo;

  if (userInfo[@"YOUR-KEY-VALUE-PAIR"] && userInfo[@"YOUR-OTHER-KEY-VALUE-PAIR"]) {

  ...

  } else {
    [NSException raise:NSGenericException format:@"Key-Value Pairs are incorrect"];
  }
}
その他のユースケース
進捗ベースでユーザーにフォーカスしたプッシュコンテンツ拡張のアイデアは無限にあり、いくつかの例としては、異なるプラットフォーム間で進捗状況を共有するオプションの追加、アンロックされた成果の表現、パンチカード、またはオンボーディングチェックリストさえも含まれています。
分析をログに記録する準備ができましたか?
以下のセクションを参照して、データのフローがどうあるべきかを理解してください。
情報取得プッシュ通知
プッシュ通知は、コンテンツ拡張の内部でユーザ情報をキャプチャし、プッシュで可能な事の限界を押し広げることができます。次のフローを調べると、ビューは状態の変化に応答できます。これらの状態変更コンポーネントは、各画像に表示されます。
- ユーザーはプッシュ通知を受信します。
- プッシュが開かれ、ユーザーに対して情報の入力を求めます。
- 情報が提供され、有効な場合は、登録ボタンが表示されます。
- 確認画面が表示され、プッシュが解除されます。
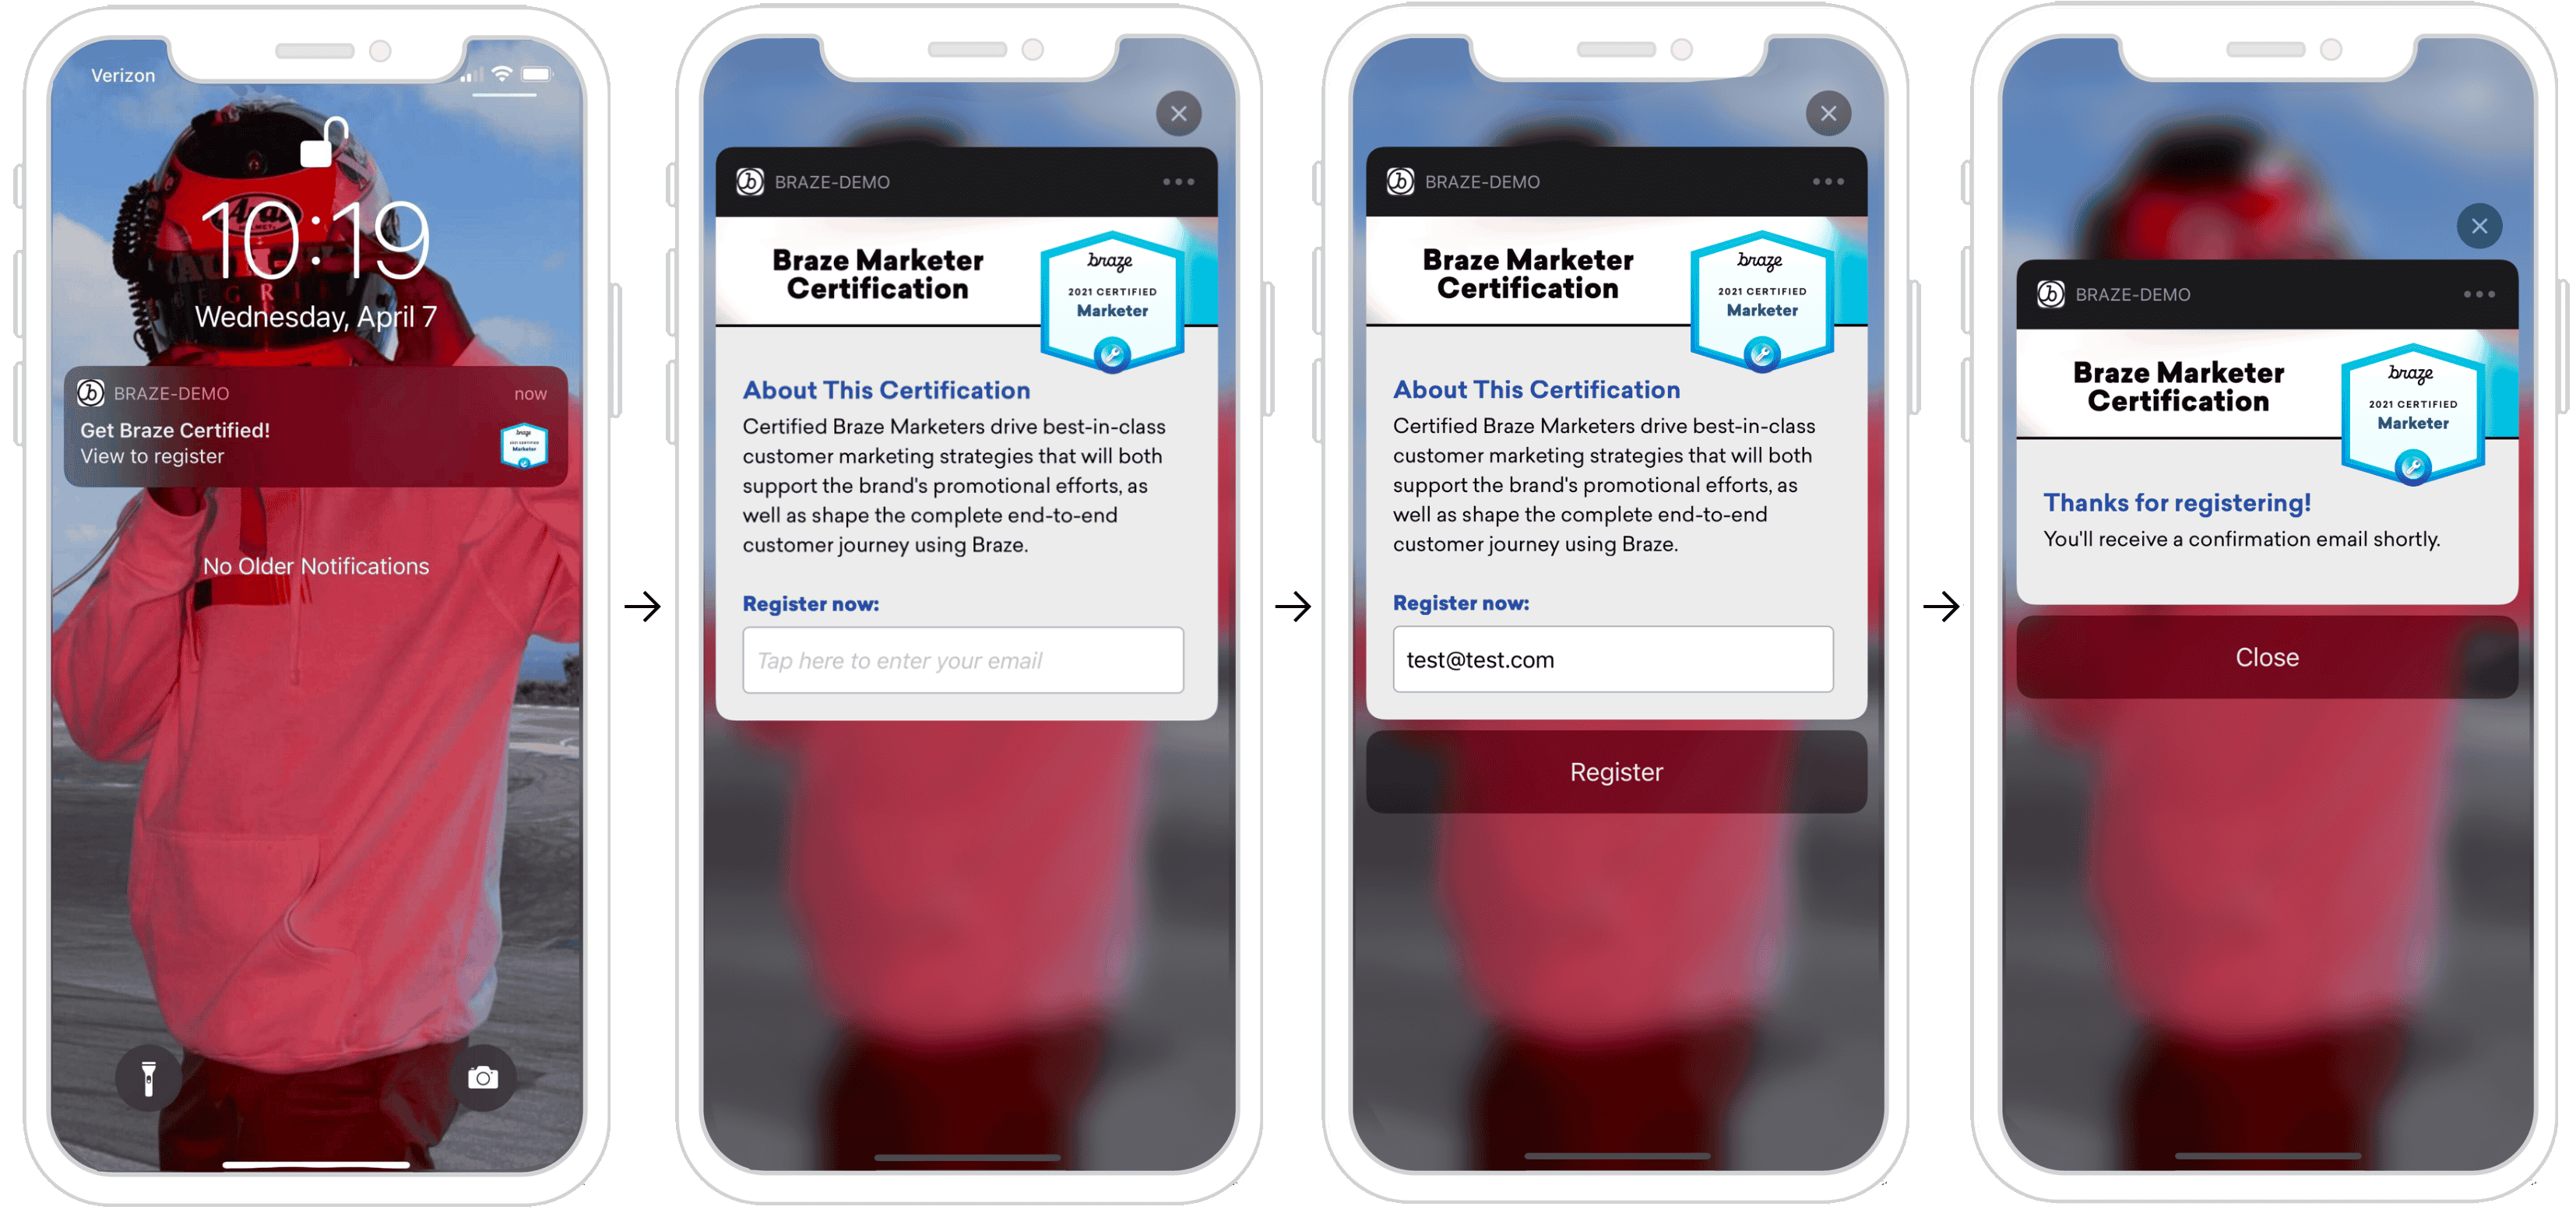
ここで要求される情報は、SMS 番号のキャプチャなどの広範なものである可能性があり、電子メール固有である必要はないことに注意してください。
ダッシュボード設定
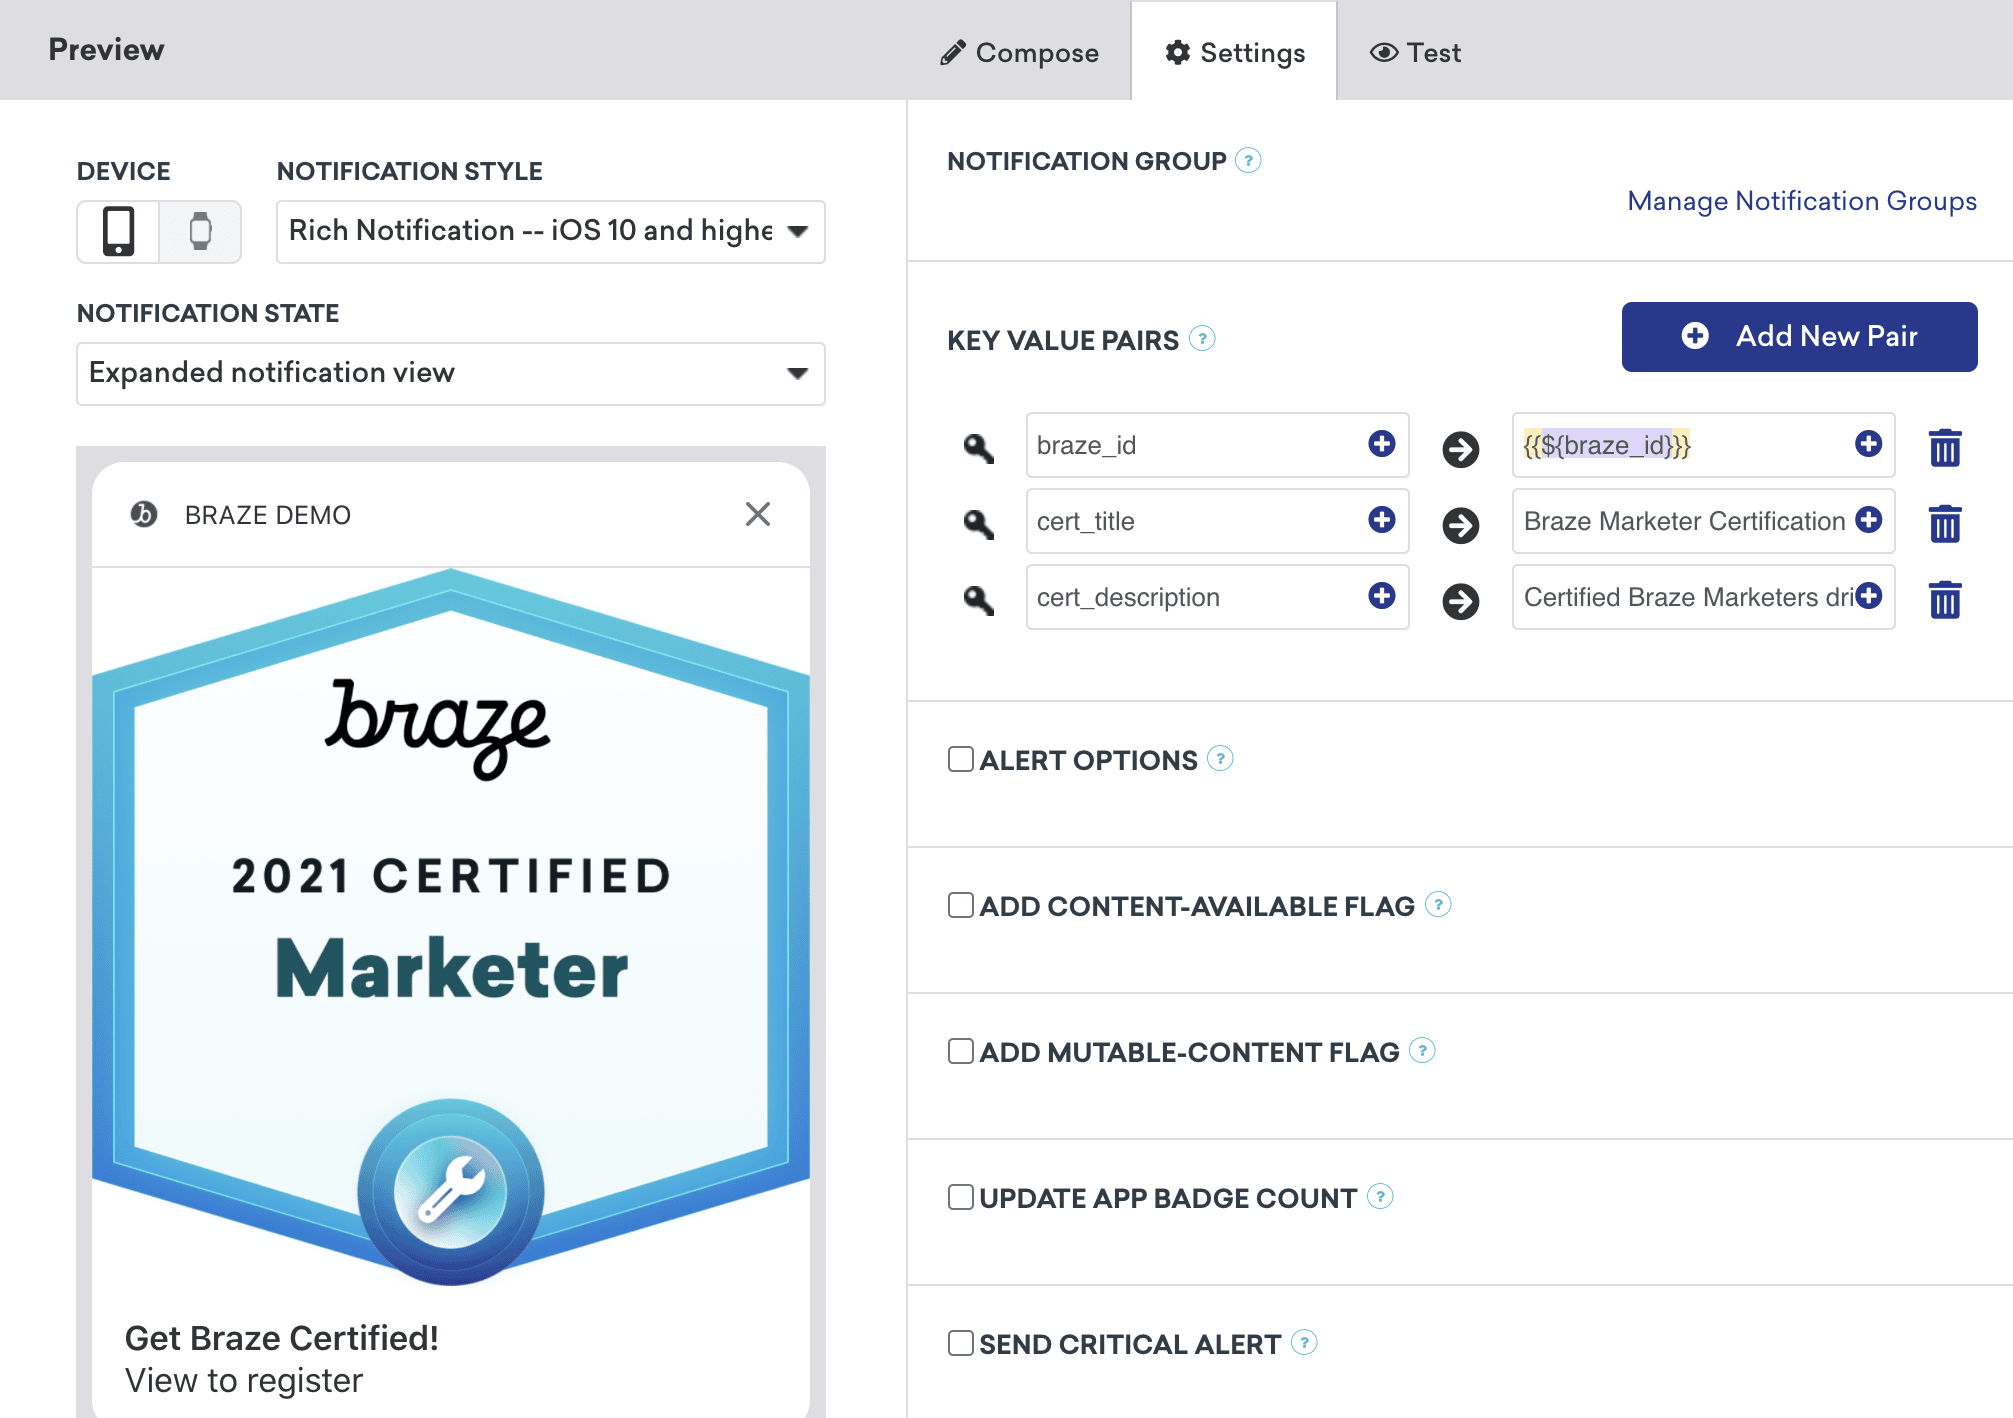
ダッシュボードで情報キャプチャ対応プッシュを設定するには、カスタムカテゴリーを登録および設定し、必要なキーと値のペアを指定する必要があります。例にあるように、プッシュに画像を含めることもできます。これを行うには、リッチプッシュ通知を統合し、キャンペーンの通知スタイルをリッチプッシュ通知に設定し、リッチプッシュ画像を含める必要があります。
ボタンアクションの処理
各アクションボタンは一意に識別されます。コードは、応答識別子が actionIndentifier と等しいかどうかをチェックし、等しい場合は、ユーザーがアクションボタンをクリックしたことと認識します。
プッシュ通知アクションボタンの応答の処理
1
2
3
4
5
6
7
func didReceive(_ response: UNNotificationResponse, completionHandler completion: @escaping (UNNotificationContentExtensionResponseOption) -> Void) {
  if response.actionIdentifier == "YOUR-REGISTER-IDENTIFIER" {
    // do something
  } else {
    // do something else
  }
}
1
2
3
4
5
6
7
- (void)didReceiveNotificationResponse:(UNNotificationResponse *)response completionHandler:(void (^)(UNNotificationContentExtensionResponseOption))completion {
  if ([response.actionIdentifier isEqualToString:@"YOUR-REGISTER-IDENTIFIER"]) {
    completion(UNNotificationContentExtensionResponseOptionDismiss);
  } else {
    completion(UNNotificationContentExtensionResponseOptionDoNotDismiss);
  }
}
プッシュの解除
プッシュ通知は、アクションボタンを押すと自動的に解除できます。推奨される事前構築済みのプッシュ解除オプションは3つあります。
completion(.dismiss)- 通知を解除しますcompletion(.doNotDismiss)- 通知は開いたままですcompletion(.dismissAndForward)- プッシュが解除され、ユーザーがアプリケーションに転送されます。
その他のユースケース
プッシュ通知を介してユーザー入力を要求することは、多くの企業が利用していない魅力的な機会です。これらのプッシュメッセージでは、名前、メール、または番号などの基本的な情報を要求できるだけでなく、ユーザープロファイルが未完了の場合は完了するようにユーザーに促したり、フィードバックを送信するように促すこともできます。
分析をログに記録する準備ができましたか?
以下のセクションを参照して、データのフローがどうあるべきかを理解してください。
分析のログ記録
Braze API を使用したロギング (推奨)
ロギング分析は、/users/track エンドポイントに到達する顧客のサーバーの助けを借りて、リアルタイムでのみ実行できます。分析をログに記録するには、braze_id 値をキーと値のペアフィールド (次のスクリーンショットを参照) に送信し、更新するユーザープロファイルを識別します。

手動ロギング
手動でログを記録するには、まず Xcode 内でアプリグループを設定してから、分析を作成、保存、および取得する必要があります。これには、お客様の側でカスタム開発者の作業が必要になります。以下に示すコードスニペットは、これを解決するのに役立ちます。
また、モバイルアプリケーションが後で起動されるまで、分析は Braze に送信されないことに注意してください。つまり、削除設定に応じて、プッシュ通知が破棄されてモバイルアプリが起動し、分析が取得されるまでに不確定な期間が存在することがよくあります。この時間バッファーがすべてのユースケースに影響するとは限りませんが、ユーザーは影響を考慮し、必要に応じて、アプリケーションを開いてこの問題に対処するようにユーザー体験を調整する必要があります。
 に送信されます。
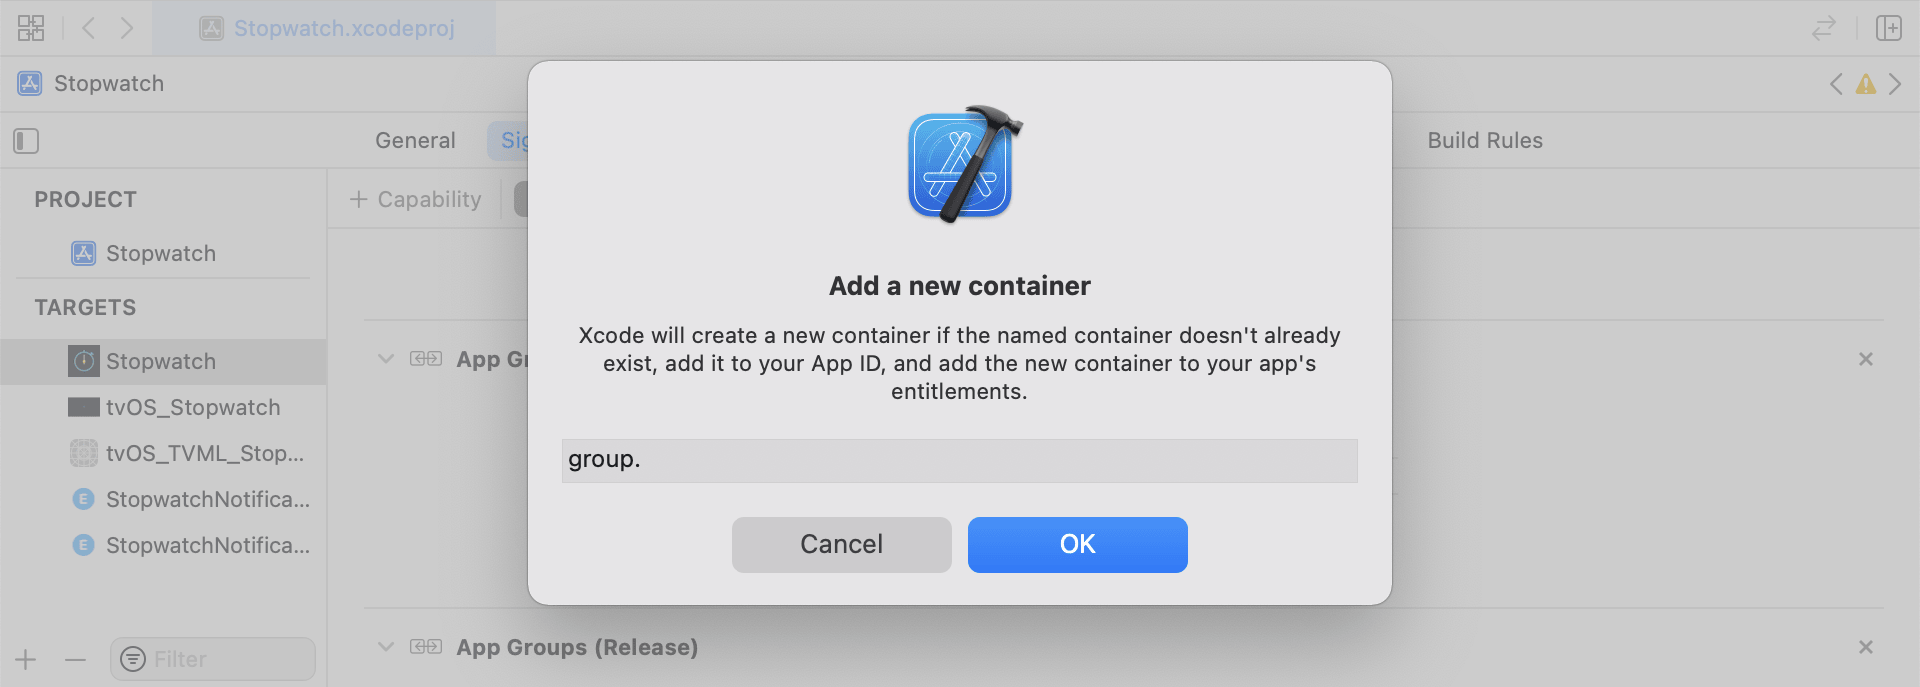
ステップ1:Xcode 内でのアプリケーショングループの設定
機能 App Groups を追加します。アプリにアプリグループがない場合は、メインアプリターゲットの機能に移動し、App Groups をオンにして、「+」をクリックします。アプリのバンドル ID を使用してアプリグループを作成します。たとえば、アプリのバンドル ID がcom.company.appname の場合、アプリグループに group.com.company.appname.xyz という名前を付けることができます。メインアプリターゲットとコンテンツ拡張ターゲットの両方で App Groups がオンになっていることを確認します。
ステップ 2:コードスニペットの統合
以下のコードスニペットは、カスタムイベント、カスタム属性、およびユーザー属性を保存および送信する方法についての役立つ参考情報です。このガイドでは UserDefaults の観点から説明しますが、コード表現はヘルパーファイル RemoteStorage の形式になります。また、追加のヘルパーファイル UserAttributes とEventName Dictionary もあり、ユーザー属性の送信と保存に使用されます。ヘルパーファイルはすべて、このガイドの末尾にあります。
カスタムイベントの保存
カスタムイベントを保存するには、分析を最初から作成する必要があります。これを行うには、辞書を作成し、メタデータを入力し、ヘルパーファイルを使用してデータを保存します。
- イベントメタデータを使用して辞書を初期化します
- イベントデータを取得して保存するには、
userDefaultsを初期化します - 既存の配列がある場合は、既存の配列に新しいデータを追加して保存します
- 既存の配列がない場合は、新しい配列を
userDefaultsに保存します
1
2
3
4
5
6
7
8
9
10
11
12
13
14
15
16
func saveCustomEvent(with properties: [String: Any]? = nil) {
  // 1
  let customEventDictionary = Dictionary(eventName: "YOUR-EVENT-NAME", properties: properties)

  // 2
  let remoteStorage = RemoteStorage(storageType: .suite)

  // 3
  if var pendingEvents = remoteStorage.retrieve(forKey: .pendingCustomEvents) as? [[String: Any]] {
    pendingEvents.append(contentsOf: [customEventDictionary])
    remoteStorage.store(pendingEvents, forKey: .pendingCustomEvents)
  } else {
  // 4
    remoteStorage.store([customEventDictionary], forKey: .pendingCustomEvents)
  }
}
1
2
3
4
5
6
7
8
9
10
11
12
13
14
15
16
17
- (void)saveCustomEvent:(NSDictionary<NSString *, id> *)properties {
  // 1
  NSDictionary<NSString *, id> *customEventDictionary = [[NSDictionary alloc] initWithEventName:@"YOUR-EVENT-NAME" properties:properties];

  // 2
  RemoteStorage *remoteStorage = [[RemoteStorage alloc] initWithStorageType:StorageTypeSuite];
  NSMutableArray *pendingEvents = [[remoteStorage retrieveForKey:RemoteStorageKeyPendingCustomEvents] mutableCopy];

  // 3
  if (pendingEvents) {
    [pendingEvents addObject:customEventDictionary];
    [remoteStorage store:pendingEvents forKey:RemoteStorageKeyPendingCustomAttributes];
  } else {
  // 4
    [remoteStorage store:@[ customEventDictionary ] forKey:RemoteStorageKeyPendingCustomAttributes];
  }
}
カスタムイベントの Braze への送信
SDK の初期化後は、通知コンテンツアプリの拡張機能から、保存された分析をログに記録するのに最適なタイミングです。これは、保留中のイベントをループして、「Event Name」キーをチェックし、Braze で適切な値を設定し、次回この関数が必要になったときに備えてストレージをクリアすることで実行できます。
- 保留中のイベントの配列をループします
pendingEvents辞書の各キーと値のペアをループします- 「Event Name」のキーを明示的にチェックし、それに応じて値を設定します
- 他のすべてのキー値が
properties辞書に追加されます - 個別のカスタムイベントを記録します
- すべての保留中のイベントをストレージから削除します
1
2
3
4
5
6
7
8
9
10
11
12
13
14
15
16
17
18
19
20
21
22
23
24
25
26
27
28
29
30
31
32
func logPendingCustomEventsIfNecessary() {
  let remoteStorage = RemoteStorage(storageType: .suite)
  guard let pendingEvents = remoteStorage.retrieve(forKey: .pendingCustomEvents) as? [[String: Any]] else { return }

  // 1
  for event in pendingEvents {
    var eventName: String?
    var properties: [AnyHashable: Any] = [:]

  // 2
    for (key, value) in event {
      if key == PushNotificationKey.eventName.rawValue {
  // 3
        if let eventNameValue = value as? String {
          eventName = eventNameValue
        } else {
          print("Invalid type for event_name key")
        }
      } else {
  // 4
        properties[key] = value
      }
    }
  // 5
    if let eventName = eventName {
      logCustomEvent(eventName, withProperties: properties)
    }
  }

  // 6
  remoteStorage.removeObject(forKey: .pendingCustomEvents)
}
1
2
3
4
5
6
7
8
9
10
11
12
13
14
15
16
17
18
19
20
21
22
23
24
25
26
27
28
29
30
31
32
- (void)logPendingEventsIfNecessary {
  RemoteStorage *remoteStorage = [[RemoteStorage alloc] initWithStorageType:StorageTypeSuite];
  NSArray *pendingEvents = [remoteStorage retrieveForKey:RemoteStorageKeyPendingCustomEvents];

  // 1
  for (NSDictionary<NSString *, id> *event in pendingEvents) {
    NSString *eventName = nil;
    NSMutableDictionary *properties = [NSMutableDictionary dictionary];

  // 2
    for (NSString* key in event) {
      if ([key isEqualToString:@"event_name"]) {
  // 3
        if ([[event objectForKey:key] isKindOfClass:[NSString class]]) {
          eventName = [event objectForKey:key];
        } else {
          NSLog(@"Invalid type for event_name key");
        }
      } else {
  // 4
        properties[key] = event[key];
      }
    }
  // 5
    if (eventName != nil) {
      [[Appboy sharednstance] logCustomEvent:eventName withProperties:properties];
    }
  }

  // 6
  [remoteStorage removeObjectForKey:RemoteStorageKeyPendingCustomEvents];
}
カスタム属性の保存
カスタム属性を保存するには、分析を最初から作成する必要があります。これを行うには、辞書を作成し、メタデータを入力し、ヘルパーファイルを使用してデータを保存します。
- 属性メタデータを使用してディクショナリを初期化します
- 属性データを取得して格納するには、
userDefaultsを初期化します - 既存の配列がある場合は、既存の配列に新しいデータを追加して保存します
- 既存の配列がない場合は、新しい配列を
userDefaultsに保存します
1
2
3
4
5
6
7
8
9
10
11
12
13
14
15
16
func saveCustomAttribute() {
  // 1
  let customAttributeDictionary: [String: Any] = ["YOUR-CUSTOM-ATTRIBUTE-KEY": "YOUR-CUSTOM-ATTRIBUTE-VALUE"]

  // 2
  let remoteStorage = RemoteStorage(storageType: .suite)

  // 3
  if var pendingAttributes = remoteStorage.retrieve(forKey: .pendingCustomAttributes) as? [[String: Any]] {
    pendingAttributes.append(contentsOf: [customAttributeDictionary])
    remoteStorage.store(pendingAttributes, forKey: .pendingCustomAttributes)
  } else {
  // 4
    remoteStorage.store([customAttributeDictionary], forKey: .pendingCustomAttributes)
  }
}
1
2
3
4
5
6
7
8
9
10
11
12
13
14
15
16
17
- (void)saveCustomAttribute {
  // 1
  NSDictionary<NSString *, id> *customAttributeDictionary = @{ @"YOUR-CUSTOM-ATTRIBUTE-KEY": @"YOUR-CUSTOM-ATTRIBUTE-VALUE" };

  // 2
  RemoteStorage *remoteStorage = [[RemoteStorage alloc] initWithStorageType:StorageTypeSuite];
  NSMutableArray *pendingAttributes = [[remoteStorage retrieveForKey:RemoteStorageKeyPendingCustomAttributes] mutableCopy];

  // 3
  if (pendingAttributes) {
    [pendingAttributes addObject:customAttributeDictionary];
    [remoteStorage store:pendingAttributes forKey:RemoteStorageKeyPendingCustomAttributes];
  } else {
  // 4
    [remoteStorage store:@[ customAttributeDictionary ] forKey:RemoteStorageKeyPendingCustomAttributes];
  }
}
カスタム属性の Braze への送信
SDK の初期化後は、通知コンテンツアプリの拡張機能から、保存された分析をログに記録するのに最適なタイミングです。これは、保留中の属性をループし、Braze で適切なカスタム属性を設定し、次回この関数が必要になったときに備えてストレージをクリアすることで実行できます。
- 保留中の属性の配列をループスルーします
pendingAttributes辞書の各キーと値のペアをループします- 対応するキーと値を持つ個別のカスタム属性を記録します
- ストレージからすべての保留中の属性を削除します
1
2
3
4
5
6
7
8
9
10
11
12
13
14
15
16
17
18
19
20
21
22
func logPendingCustomAttributesIfNecessary() {
  let remoteStorage = RemoteStorage(storageType: .suite)
  guard let pendingAttributes = remoteStorage.retrieve(forKey: .pendingCustomAttributes) as? [[String: Any]] else { return }

  // 1
  pendingAttributes.forEach { setCustomAttributesWith(keysAndValues: $0) }

  // 4
  remoteStorage.removeObject(forKey: .pendingCustomAttributes)
}

func setCustomAttributesWith(keysAndValues: [String: Any]) {
  // 2
  for (key, value) in keysAndValues {
  // 3
    if let value = value as? [String] {
      setCustomAttributeArrayWithKey(key, andValue: value)
    } else {
      setCustomAttributeWithKey(key, andValue: value)
    }
  }
}
1
2
3
4
5
6
7
8
9
10
11
12
13
14
15
16
17
18
19
20
- (void)logPendingCustomAttributesIfNecessary {
  RemoteStorage *remoteStorage = [[RemoteStorage alloc] initWithStorageType:StorageTypeSuite];
  NSArray *pendingAttributes = [remoteStorage retrieveForKey:RemoteStorageKeyPendingCustomAttributes];

  // 1
  for (NSDictionary<NSString*, id> *attribute in pendingAttributes) {
    [self setCustomAttributeWith:attribute];
  }

  // 4
  [remoteStorage removeObjectForKey:RemoteStorageKeyPendingCustomAttributes];
}

- (void)setCustomAttributeWith:(NSDictionary<NSString *, id> *)keysAndValues {
  // 2
  for (NSString *key in keysAndValues) {
  // 3
    [self setCustomAttributeWith:key andValue:[keysAndValues objectForKey:key]];
  }
}
ユーザー属性の保存
ユーザー属性を保存する場合は、更新されている属性のタイプ(email、first_name、phone_number など) を解読するカスタムオブジェクトを作成することをお勧めします。オブジェクトは、UserDefaults からの保管 / 取得に対応している必要があります。これを行う方法の一例については、UserAttribute ヘルパーファイルを参照してください。
- エンコードされた
UserAttributeオブジェクトを対応する型で初期化します - イベントデータを取得して保存するには、
userDefaultsを初期化します - 既存の配列がある場合は、既存の配列に新しいデータを追加して保存します
- 既存の配列がない場合は、新しい配列を
userDefaultsに保存します
1
2
3
4
5
6
7
8
9
10
11
12
13
14
15
16
func saveUserAttribute() {
  // 1
  guard let data = try? PropertyListEncoder().encode(UserAttribute.userAttributeType("USER-ATTRIBUTE-VALUE")) else { return }

  // 2
  let remoteStorage = RemoteStorage(storageType: .suite)

  // 3
  if var pendingAttributes = remoteStorage.retrieve(forKey: .pendingUserAttributes) as? [Data] {
    pendingAttributes.append(contentsOf: [data])
    remoteStorage.store(pendingAttributes, forKey: .pendingUserAttributes)
  } else {
  // 4
    remoteStorage.store([data], forKey: .pendingUserAttributes)
  }
}
1
2
3
4
5
6
7
8
9
10
11
12
13
14
15
16
17
18
19
20
21
22
23
- (void)saveUserAttribute {
  // 1
  UserAttribute *userAttribute = [[UserAttribute alloc] initWithUserField:@"USER-ATTRIBUTE-VALUE" attributeType:UserAttributeTypeEmail];

  NSError *error;
  NSData *data = [NSKeyedArchiver archivedDataWithRootObject:userAttribute requiringSecureCoding:YES error:&error];

  if (error != nil) {
    // log error
  }
  // 2
  RemoteStorage *remoteStorage = [[RemoteStorage alloc] initWithStorageType:StorageTypeSuite];
  NSMutableArray *pendingAttributes = [[remoteStorage retrieveForKey:RemoteStorageKeyPendingUserAttributes] mutableCopy];

  // 3
  if (pendingAttributes) {
    [pendingAttributes addObject:data];
    [remoteStorage store:pendingAttributes forKey:RemoteStorageKeyPendingUserAttributes];
  } else {
  // 4
    [remoteStorage store:@[data] forKey:RemoteStorageKeyPendingUserAttributes];
  }
}
Braze へのユーザー属性の送信
SDK の初期化後は、通知コンテンツアプリの拡張機能から、保存された分析をログに記録するのに最適なタイミングです。これは、保留中の属性をループし、Braze で適切なカスタム属性を設定し、次回この関数が必要になったときに備えてストレージをクリアすることで実行できます。
pendingAttributesデータの配列をループします- 属性データからエンコードされた
UserAttributeオブジェクトを初期化します - ユーザー属性タイプ (電子メール) に基づいて特定のユーザーフィールドを設定します
- ストレージからすべての保留中のユーザー属性を削除します
1
2
3
4
5
6
7
8
9
10
11
12
13
14
15
16
17
18
func logPendingUserAttributesIfNecessary() {
  let remoteStorage = RemoteStorage(storageType: .suite)
  guard let pendingAttributes = remoteStorage.retrieve(forKey: .pendingUserAttributes) as? [Data] else { return }

  // 1
  for attributeData in pendingAttributes {
  // 2
    guard let userAttribute = try? PropertyListDecoder().decode(UserAttribute.self, from: attributeData) else { continue }

  // 3
    switch userAttribute {
    case .email(let email):
      user?.email = email
    }
  }
  // 4
  remoteStorage.removeObject(forKey: .pendingUserAttributes)
}
1
2
3
4
5
6
7
8
9
10
11
12
13
14
15
16
17
18
19
20
21
22
23
24
25
26
27
- (void)logPendingUserAttributesIfNecessary {
  RemoteStorage *remoteStorage = [[RemoteStorage alloc] initWithStorageType:StorageTypeSuite];
  NSArray *pendingAttributes = [remoteStorage retrieveForKey:RemoteStorageKeyPendingUserAttributes];

  // 1
  for (NSData *attributeData in pendingAttributes) {
    NSError *error;

  // 2
    UserAttribute *userAttribute = [NSKeyedUnarchiver unarchivedObjectOfClass:[UserAttribute class] fromData:attributeData error:&error];

    if (error != nil) {
      // log error
    }

  // 3
    if (userAttribute) {
      switch (userAttribute.attributeType) {
        case UserAttributeTypeEmail:
          [self user].email = userAttribute.userField;
          break;
      }
    }
  }
  // 4
  [remoteStorage removeObjectForKey:RemoteStorageKeyPendingUserAttributes];
}
ヘルパーファイル
RemoteStorage Helper File
1
2
3
4
5
6
7
8
9
10
11
12
13
14
15
16
17
18
19
20
21
22
23
24
25
26
27
28
29
30
31
32
33
34
35
36
37
38
39
40
41
42
43
44
45
46
enum RemoteStorageKey: String, CaseIterable {

  // MARK: - Notification Content Extension Analytics
  case pendingCustomEvents = "pending_custom_events"
  case pendingCustomAttributes = "pending_custom_attributes"
  case pendingUserAttributes = "pending_user_attributes"
}

enum RemoteStorageType {
  case standard
  case suite
}

class RemoteStorage: NSObject {
  private var storageType: RemoteStorageType = .standard
  private lazy var defaults: UserDefaults = {
    switch storageType {
    case .standard:
      return .standard
    case .suite:
      return UserDefaults(suiteName: "YOUR-DOMAIN-IDENTIFIER")!
    }
  }()

  init(storageType: RemoteStorageType = .standard) {
    self.storageType = storageType
  }

  func store(_ value: Any, forKey key: RemoteStorageKey) {
    defaults.set(value, forKey: key.rawValue)
  }

  func retrieve(forKey key: RemoteStorageKey) -> Any? {
    return defaults.object(forKey: key.rawValue)
  }

  func removeObject(forKey key: RemoteStorageKey) {
    defaults.removeObject(forKey: key.rawValue)
  }

  func resetStorageKeys() {
    for key in RemoteStorageKey.allCases {
      defaults.removeObject(forKey: key.rawValue)
    }
  }
}
1
2
3
4
5
6
7
8
9
10
11
12
13
14
15
16
17
18
19
20
21
22
23
24
25
26
27
28
29
30
31
32
33
34
35
36
37
38
39
40
41
42
43
44
45
46
47
48
49
50
51
52
53
54
55
56
57
58
59
60
@interface RemoteStorage ()

@property (nonatomic) StorageType storageType;
@property (nonatomic, strong) NSUserDefaults *defaults;

@end

@implementation RemoteStorage

- (id)initWithStorageType:(StorageType)storageType {
  if (self = [super init]) {
    self.storageType = storageType;
  }
  return self;
}

- (void)store:(id)value forKey:(RemoteStorageKey)key {
  [[self defaults] setValue:value forKey:[self rawValueForKey:key]];
}

- (id)retrieveForKey:(RemoteStorageKey)key {
  return [[self defaults] objectForKey:[self rawValueForKey:key]];
}

- (void)removeObjectForKey:(RemoteStorageKey)key {
  [[self defaults] removeObjectForKey:[self rawValueForKey:key]];
}

- (void)resetStorageKeys {
  [[self defaults] removeObjectForKey:[self rawValueForKey:RemoteStorageKeyPendingCustomEvents]];
  [[self defaults] removeObjectForKey:[self rawValueForKey:RemoteStorageKeyPendingCustomAttributes]];
  [[self defaults] removeObjectForKey:[self rawValueForKey:RemoteStorageKeyPendingUserAttributes]];
}

- (NSUserDefaults *)defaults {
  if (!self.defaults) {
    switch (self.storageType) {
      case StorageTypeStandard:
        return [NSUserDefaults standardUserDefaults];
        break;
      case StorageTypeSuite:
        return [[NSUserDefaults alloc] initWithSuiteName:@"YOUR-DOMAIN-IDENTIFIER"];
    }
  } else {
    return self.defaults;
  }
}

- (NSString*)rawValueForKey:(RemoteStorageKey)remoteStorageKey {
    switch(remoteStorageKey) {
    case RemoteStorageKeyPendingCustomEvents:
      return @"pending_custom_events";
    case RemoteStorageKeyPendingCustomAttributes:
      return @"pending_custom_attributes";
    case RemoteStorageKeyPendingUserAttributes:
      return @"pending_user_attributes";
    default:
      [NSException raise:NSGenericException format:@"Unexpected FormatType."];
  }
}
UserAttribute Helper File
1
2
3
4
5
6
7
8
9
10
11
12
13
14
15
16
17
18
19
20
21
22
23
24
25
26
enum UserAttribute: Hashable {
  case email(String?)
}

// MARK: - Codable
extension UserAttribute: Codable {
  private enum CodingKeys: String, CodingKey {
    case email
  }

  func encode(to encoder: Encoder) throws {
    var values = encoder.container(keyedBy: CodingKeys.self)

    switch self {
    case .email(let email):
      try values.encode(email, forKey: .email)
    }
  }

  init(from decoder: Decoder) throws {
    let values = try decoder.container(keyedBy: CodingKeys.self)

    let email = try values.decode(String.self, forKey: .email)
    self = .email(email)
  }
}
1
2
3
4
5
6
7
8
9
10
11
12
13
14
15
16
17
18
19
20
21
22
23
24
25
26
@implementation UserAttribute

- (id)initWithUserField:(NSString *)userField attributeType:(UserAttributeType)attributeType {
  if (self = [super init]) {
    self.userField = userField;
    self.attributeType = attributeType;
  }
  return self;
}

- (void)encodeWithCoder:(NSCoder *)encoder {
  [encoder encodeObject:self.userField forKey:@"userField"];
  [encoder encodeInteger:self.attributeType forKey:@"attributeType"];
}

- (id)initWithCoder:(NSCoder *)decoder {
  if (self = [super init]) {
    self.userField = [decoder decodeObjectForKey:@"userField"];

    NSInteger attributeRawValue = [decoder decodeIntegerForKey:@"attributeType"];
    self.attributeType = (UserAttributeType) attributeRawValue;
  }
  return self;
}

@end
EventName Dictionary Helper File
1
2
3
4
5
6
7
8
9
10
11
12
extension Dictionary where Key == String, Value == Any {
  init(eventName: String, properties: [String: Any]? = nil) {
    self.init()
    self[PushNotificationKey.eventName.rawValue] = eventName

    if let properties = properties {
      for (key, value) in properties {
        self[key] = value
      }
    }
  }
}
1
2
3
4
5
6
7
8
9
10
11
12
13
14
15
@implementation NSDictionary (Helper)

- (id)initWithEventName:(NSString *)eventName properties:(NSDictionary *)properties {
  self = [self init];
  if (self) {
    dict[@"event_name"] = eventName;

    for(id key in properties) {
      dict[key] = properties[key];
    }
  }
  return self;
}

@end
 GitHub でこのページを編集